Inquiry Management
Inquiries are a key component of the Reservation Manager, the central feature of our Property Management System. Before booking a property, guests may have questions about various topics, such as extra services. Since a reservation hasn’t been made yet, you need an effective way to handle these queries.
Inquiries can come from various sources like your website, channel listing sites, email, phone, or face-to-face.
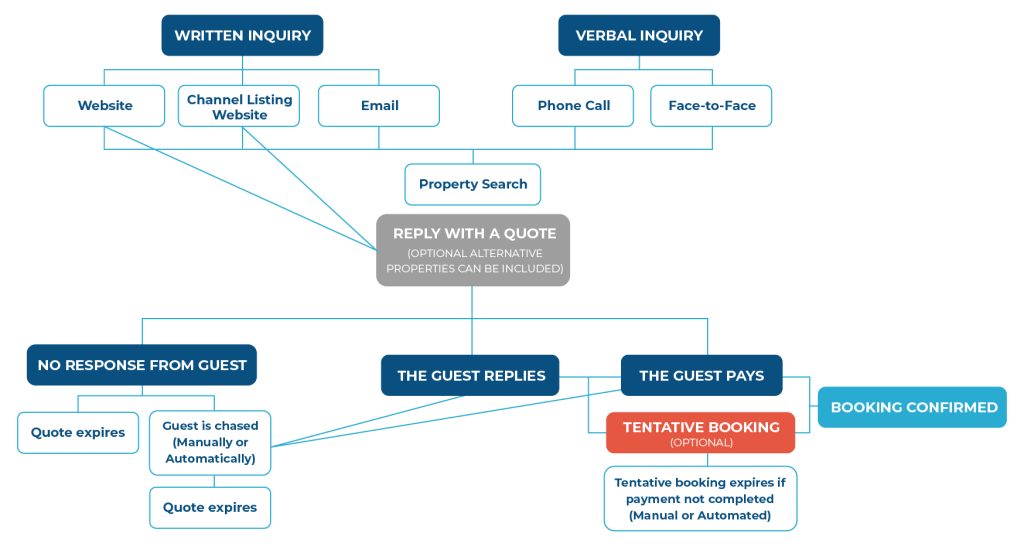
Prospective guests expect replies that are comprehensive, accurate, professional, and personal. The market increasingly demands faster response times each year.
Handling even a single inquiry manually involves checking availability, pricing, promotions, calculating a quote, and crafting a guest-specific email, all of which can take 15-20 minutes. This process doesn’t typically include booking, payment options, or a digitally signed agreement, and is prone to costly errors.
Many quotes need amendments, requiring repeated efforts, and the inefficiencies persist throughout the reservation management process, leading to significant negative implications. However, there is a way to automate and streamline all these tasks, reducing the response time to seconds. In this tutorial, we will learn how to manage all of these challenges.
TABLE OF CONTENTS
Inquiry from Website/Channel Listing Website
Receiving an inquiry into the system
Adjust property default settings for individual inquiries
What scenarios can occur after the quotation is sent?
Another guest books the property, what happens to the pending quotes?
The guest would like to book, but pay at a later time
Face-to-Face / Phone call Quote
WRITTEN INQUIRY
Inquiry from Website/Channel Listing Website
As we mentioned initially, inquiries can originate from various sources, including website inquiry forms, social media, email campaigns, channel listing sites (e.g., Vrbo, Airbnb), phone, or in-person. Managing written and verbal inquiries effectively is crucial.
Receiving an inquiry into the system
Let’s start with managing written inquiries, using an example from the booking engine on your website, applicable to all written sources.
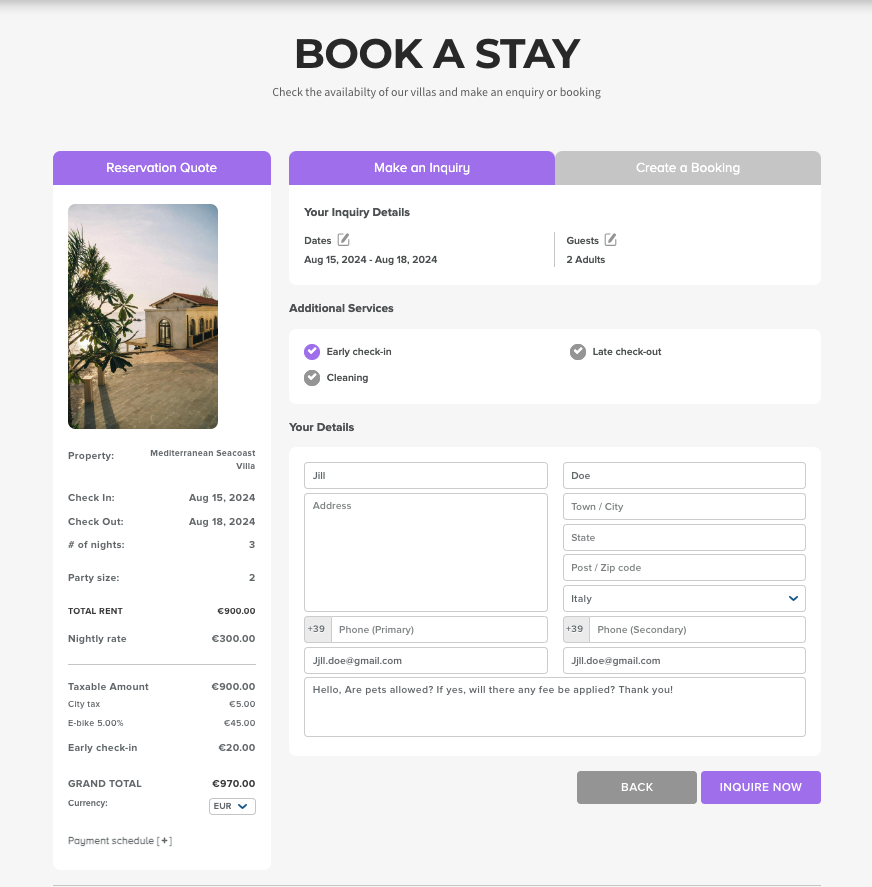
The inquiry will be received in the Reservation Manager ” Inquiries” inbox, inside your 365Villas account.
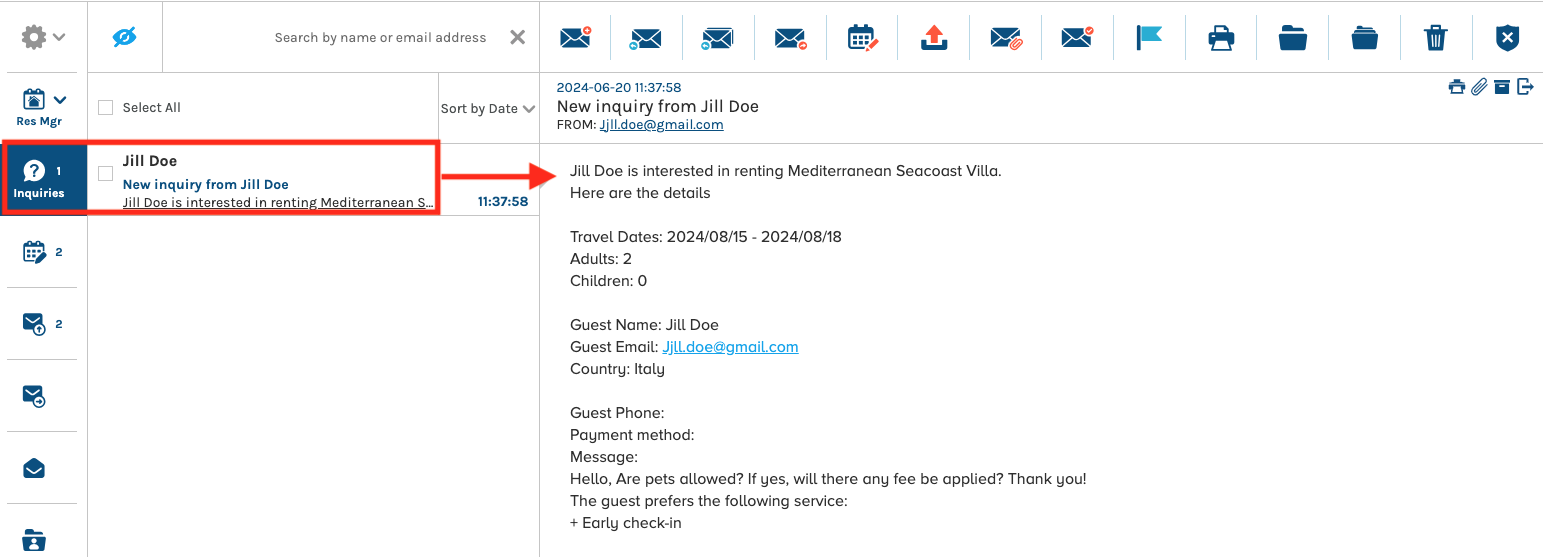
Quote Creation
Once you receive an inquiry, you will want to take action and provide the requested information. To do this, click on the inquiry and select the “Create Quote or Booking” icon located above the sender’s email address.
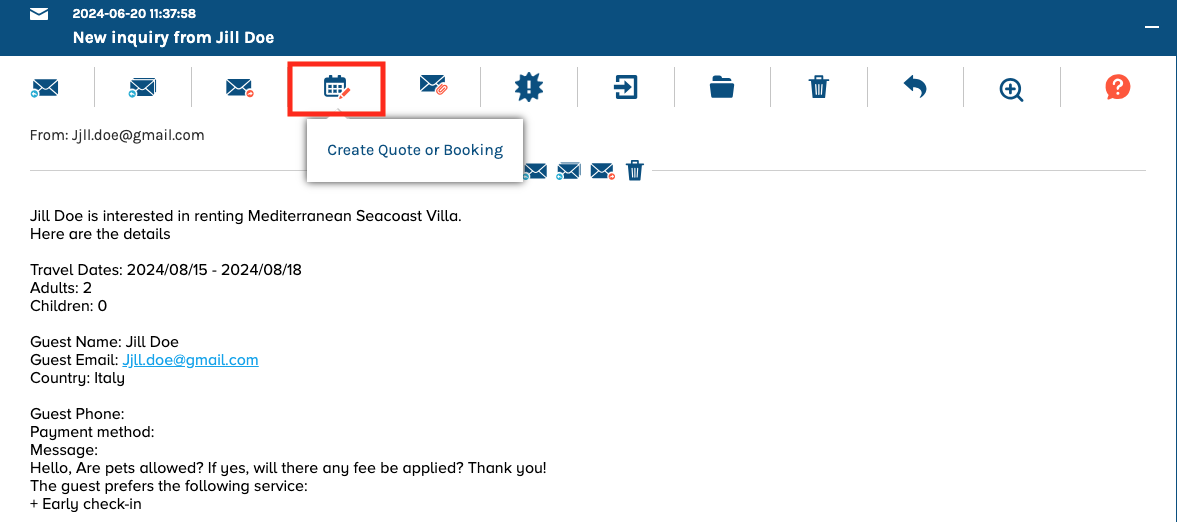
When you select this option, a new popup will open, automatically populating with the information provided by the guest in the booking form. This popup allows you to perform various actions, such as selecting the reply language and editing any of the guest’s information.
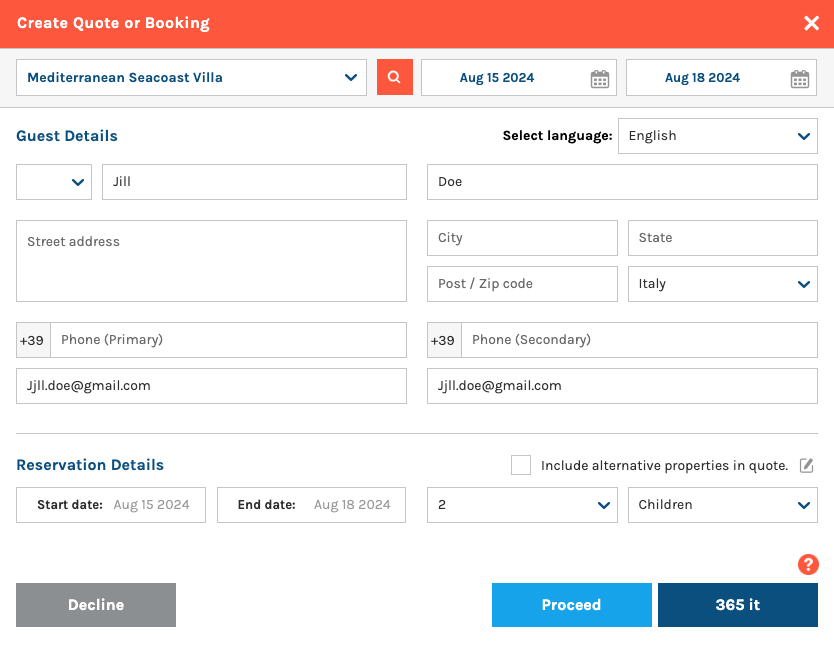
Including Alternative Properties
To suggest other available properties your guest might like, in addition to send a quote for the property the guest inquired about, you can also check the “Include alternative properties in quote” box. To activate this feature, navigate to:
1. Portfolio Management > Portfolio Manager > Link Properties.
2. Under “Select Property”, choose the main property you want to link to alternative properties.
3. Search for properties by name or select them from the list. By checking the box, the property will be added to the “Assigned Properties” list.
4. Adjust the order of the properties by dragging and dropping them.
5. Select the number of properties to include in your quote under “Maximum alternative properties.”
6. Save your settings by clicking “Save” at the bottom of the page.
You can set default alternative properties for each property, so the system will automatically include this information when you select the “Include alternative properties in quote” feature. You can view or remove the default property choices before sending the quote by simply selecting the edit pencil button next to the “Include alternative properties in quote” feature.
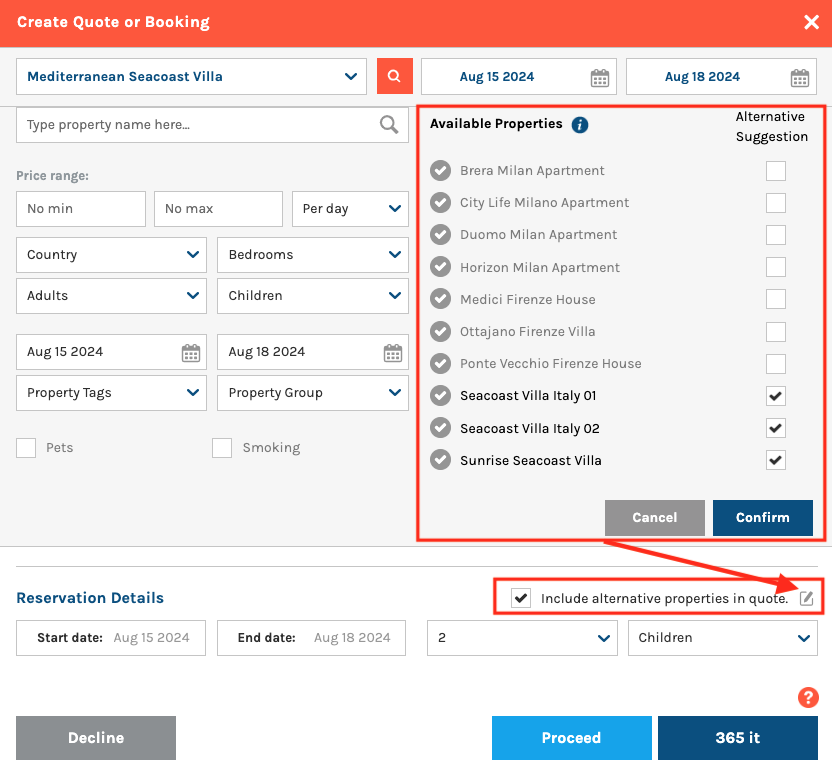
Once you defined the information in the popup window, you can perform the following actions:
- Proceed: If the guest has questions or requests more than just a quote, click “Proceed” to go to the Booking Editor, where you can reply and manage other settings.
- 365 it!: This button automatically generates and sends a quote without going to the Booking Editor. 365Villas will create a quote and send your Create Quote Email Message. If you use our integrated Rental Agreement feature, it will be included as well.
- Decline: This sends your Decline Automated Message and saves the guest’s details in your contact database.
Replying to an inquiry
To respond to the inquiry after the quote is created, click on Proceed and select the “Email” button at the top of the Booking Editor to start your response.
The email will automatically include the stay details and any changes you made to the property settings in the Booking Editor (see next paragraph). It will also display alternative properties you have selected and the payment schedule, complete with buttons for completing the payment.
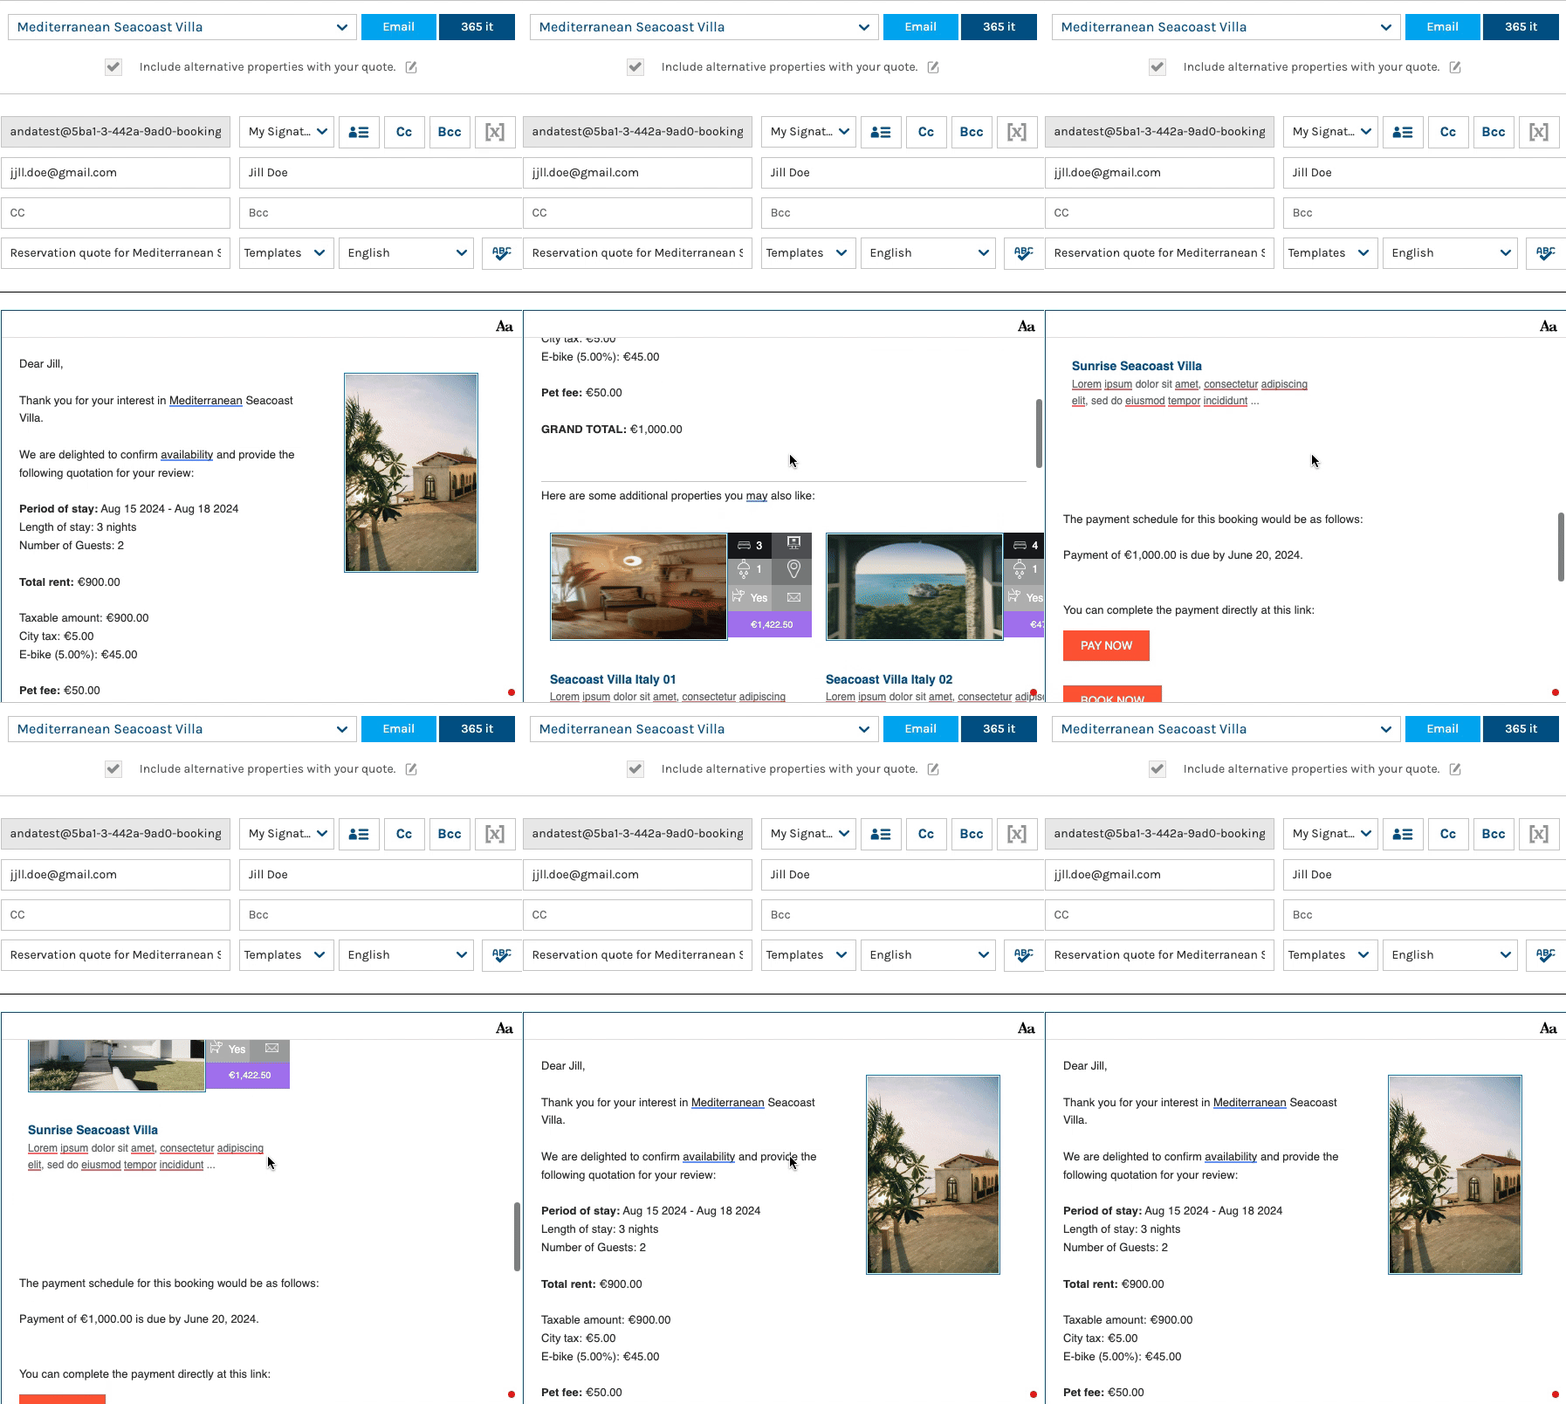
Once you’ve reviewed everything and amended the email content, click “Send” at the bottom of the page to send the quotation to the guest. The system will grey out the selected dates, but direct bookings will still be possible.
Adjust property default settings for individual inquiries
Based on the guest’s inquiry, you can modify specific settings directly from this page before sending the final quote. These settings will be automatically populated in the email without requiring manual search or text input:
Special Terms
Add any additional special terms for a specific guest. These inputs will appear in the guest’s rental agreement and on your Bookings Report once the booking is completed.
Taxes
You can add new taxes or remove the default ones set in your Property Settings for a specific quotation. This action applies only to the current booking without affecting the general property settings. Select the Taxes section > Open the dropdown options under “Apply taxes” > Select the tax you wish to apply > Click the Add+ orange button. A new row will display the selected tax.
Services
If the guest inquires about a service not listed in your default offerings, you can add it to the quote. Select Services > Add+ orange button. A new row will appear where you can enter the service and its pricing.
Discounts
Manually add a discount value or percentage by selecting Discounts > Add+ orange button. A new row will appear where you can enter the discount value or percentage.
Record notes
Record notes for yourself and your team.These will be automatically pushed to the relevant reports.
Payment Schedule
Allows you to visualize a summary of due payments, history of payments and manage payment manually or through automation.
Operations/ Dates & Occupants
You can manually set the housekeeper, check-in manager, modify the dates and occupants and also change currency for the specific quote.
If you would like also to change the language from the default English, you can scroll to the bottom of the page , click on “Language” and select the desired language from the dropdown options.
Payment Policy
You can modify the payment and deposit policy settings for a specific property.
New and Implemented – Automation
- Turn off only the Quote Chaser
You can disable the automatic quote chaser for a specific guest. For instance, if the guest contacted you by phone, there is no need to chase them via email.
- Turn off all Guest-Facing Automation
This option disables all email automation for this specific guest.
Expiry
Auto-Expiry of Quotes
Guests may not always respond after receiving a quote. To manage this, you can set an expiration term for the quote, either to free up availability or create a sense of urgency. There are two ways to do this:
1. Default Rules
- Set up default rules to expire quotes after a certain period for all properties. Go to: Account Settings > Special Preferences > Auto-Expiry of Quotes & Tentative Bookings.
- Check the box to automatically cancel and archive quotes based on the specified number of days after issuance.
2. Override Default Rules
- Override the general settings for a specific quote in the Booking Editor.
- This allows you to set a different expiration period for a particular quote, automatically canceling and archiving it X days after issuance.
Tentative Bookings
Automatically cancel and archive tentative bookings if no payment is received within X days of the first payment becoming overdue.
Discounts
Manually add a discount value or percentage by selecting Discounts > Add+ orange button. A new row will appear where you can enter the discount value or percentage.
Automatically Send Quotation
You can set up the system to automatically respond to quotation inquiries by enabling the feature under Account Settings > Templates & Automation > System Email Templates > Responding with a Quote.
In this section, you will find the email template that will be sent to guests. The template is fully customizable, allowing you to set the conditions for when the automation will trigger. You can choose to activate this feature only for channel listing sites, only for your website, or for both.
What scenarios can occur after the quotation is sent?
After a quotation is sent, the following scenarios can occur:

The Guest Doesn’t Reply
You have two options for following up with the guest:
1. Manual Follow-Up:
- Navigate to Business Management > Reports > Quotes.
- Select the time period for the sent quotations.
- Check property availability in the “Available” column.
- Contact the guest via the email or phone number provided under the “Guest Details” column.
2. Automatic Follow-Up:
- Go to Account Settings > Templates & Automation > Automated Messages > Quote Chaser.
- Use the default messaging or create personalized content.
- Set conditions for the automation to send a follow-up once every “X” days, up to three times per day.
- The system will automatically stop sending follow-ups once a response is received or a booking is made.
- You can customize the content for the first, second, and third messages and create messages in different languages if using the “Multiple Languages” bolt-on.
Auto-Expiry of Quotes
To handle guests who don’t respond after receiving a quotation, you can set an expiration term for the quote:
1. Default Expiration Rules:
- Go to Account Settings > Special Preferences > Auto-Expiry of Quotes & Tentative Bookings.
- Check the box to automatically cancel and archive quotes after a certain number of days.
2. Specific Booking Expiration:
- In the Booking Editor > Expiry, set the expiration for the specific booking, which overrides default settings.
- The system will notify the guest via email when their quote expires. The email template is located at Account Settings > Templates & Automation > Automated Messages > Cancelation > Expired Quote.
Another guest books the property, what happens to the pending quotes?
If a property with pending quotations is booked by someone else, the system will notify the other guests via email and propose alternative properties.
The email template can be found under Account Settings > Templates & Automation > Automated Messages > Cancelation > No Longer Available.
The guest would like to book, but pay at a later time
The tentative bookings feature allows a temporary hold on a property until the guest or property manager confirms the booking. It is typically used when a guest pays by bank transfer.
- To create a tentative booking, select the quote in the Bookings inbox to open the full booking details.
- Click on the “Create a tentative booking” icon at the top of the page. The system will populate the email content based on the settings under Account Settings > Templates & Automation > System Email Templates > Making a Tentative Booking.
- Once confirmed, the selected dates will be marked in orange on the calendar, making them unavailable for other bookings.

You can also set an expiration for tentative bookings and there are two ways of doing this:
1. Default Expiration Rules:
- Go to Account Settings > Special Preferences > Auto-Expiry of Quotes & Tentative Bookings.
- Check the box to automatically cancel and archive tentative bookings if no payment is received within a certain number of days.
2. Specific Booking Expiration:
- In the Booking Editor > Expiry, set the expiration for the specific booking, which overrides default settings.
- The system will notify the guest via email when their tentative booking expires due to non-payment. The email template can be found under Account Settings > Templates & Automation > Automated Messages > Cancellation > No Payment.
Each time a quotation inquiry is received, the dates will appear greyed out on your calendar, indicating there is a quotation but the dates are still available for bookings. Additionally, the guest’s information will be automatically saved in your contact database within your 365Villas account.
Confirming a Booking
For a booking to be confirmed, a payment must be registered in the system and a booking confirmation email must be sent to the guest.
- You can choose to manually confirm the booking or let the system do it automatically.
- Under Account Settings > Templates & Automation > Automated Messages > Funds Received, if the checkbox “When a Payment is recorded, 365Villas will ask you if it can send this message” is selected, the system will wait for your confirmation before registering the booking.
- If the checkbox is unchecked, the system will automatically send the email and register the booking.
Once these conditions are met, the dates will display in light blue on your 365Villas calendar, making them unavailable for other bookings.
Direct Email Contact Quote
If a guest contacts you directly via email, without requesting a quote through the booking form and is asking for general information about properties, you will receive this request in the 365Villas Inquiries inbox. By selecting it, you can create a quote and attach a property. To do this, click the “Create Quote or Booking” icon located above the sender’s email address.
Once selected, a new popup will open, and you will notice that some information related to the guest (email, name) is automatically captured by the system.
This popup allows you to perform various actions, including selecting the property to attach to the booking, adding alternative properties,, and setting the stay dates, as we have seen in the above paragraphs.
If you have multiple properties, the system provides an advanced search feature that lets you filter properties based on different criteria. Click the orange search button, and you can search properties by name or criteria such as price, number of bedrooms, country, etc. The system will display the available properties for the selected dates and allow you to choose alternative properties based on availability for the chosen timeframe.
Once the information is selected, click “Proceed” to send the quote.
The quote information can also be modified later in the Booking Editor, after the quote is sent, by selecting the quote either form the calendar, Bookings email inbox or from reports (Business Management > Reports > Quotes). Once you open the quote details, you can select the Update or Amend icon, located above the email subject.
VERBAL INQUIRY
Face-to-Face / Phone call Quote
If someone requests a quote for one or more properties via phone or face-to-face, you can easily provide this information by checking the properties in your 365Villas account.
- Go to Portfolio Management > Advanced Search.
- Filter the properties based on the criteria provided by the guest, such as price, bedrooms, country, etc. You can also search for properties by name.
- Click on the Results Table button. The system will display the available properties for the specified dates.
- A new page will open with a list of properties. Here, you can select the main property and include alternative properties to send to the guest (if requested via phone).
- Next, select Create a Quote, and the system will automatically populate the stay details, alternative properties, and the payment schedule, along with buttons to complete the payment.
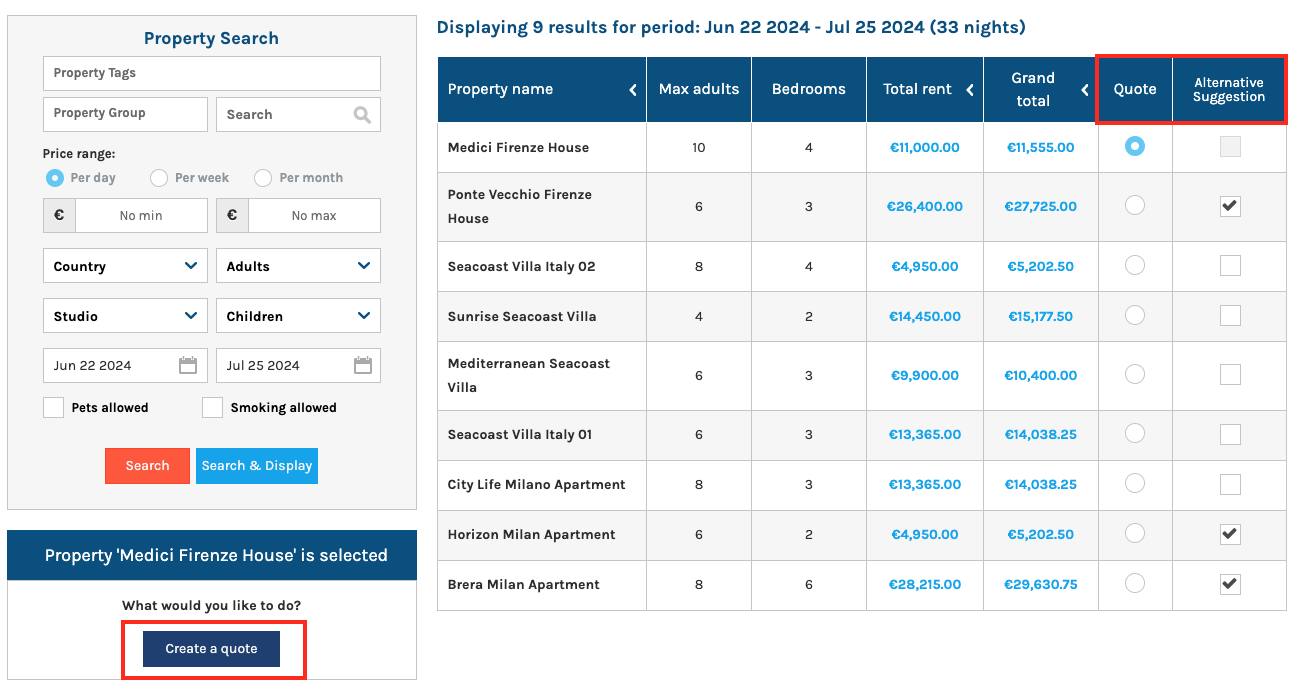
You can also show properties from your website, but the 365villas system allows you to easily view alternative properties and create a quote, while the website will allow you more limited actions.
Once you decide to proceed with the quote, please follow the instructions previously provided in the“Quote Creation” paragraph to create the quote.
