To edit a page start by selecting ‘pages’ from the left menu in your content management system. Click to edit the page you want to work on.
The first screen that you see controls the settings for the page. Before editing the content of the page, using the DIVI builder, you can also control various aspects of your page:
- Above the ‘edit with the Divi Builder’ button is the page title. You can click and change the title is you wish.
Selecting the righthand document tab enables you to control the following:
- Under the status and visibility section you can set the page visibility. A public page is ‘visible’ to all visitors. A private or password protected can only be accessed by site admins or by people that you provide a password to.
- You can change the publish date. This is useful with blog articles, as they are ordered in date order.
- The permalink for the page. Attractively called the url-slug! This is where you control the page address. For example is the url slug is about-us. The full address for this page on your website would be https://yourdomainname.com/about-us.
- Featured image. This is only used with blog posts, not pages.
- Excerpt. Again, this is only used with blogs and sets the intro text to your blog article.
- The other settings in the right hand column can be left as the default
If you make any changes to the page settings, you need to click ‘update’ (top right of the screen). So that the changes are saved.
Divi Builder Intro
Your website has been built using a page builder called DIVI. This is a powerful tool which enables you to control as much, or as little, of your website as you need to get the end result you want to achieve.
When you have made any required changes to the settings of the page you are now ready to edit the content. Click the purple ‘Edit With The Divi Builder’ button. This loads a live, editable view of the page you are editing.
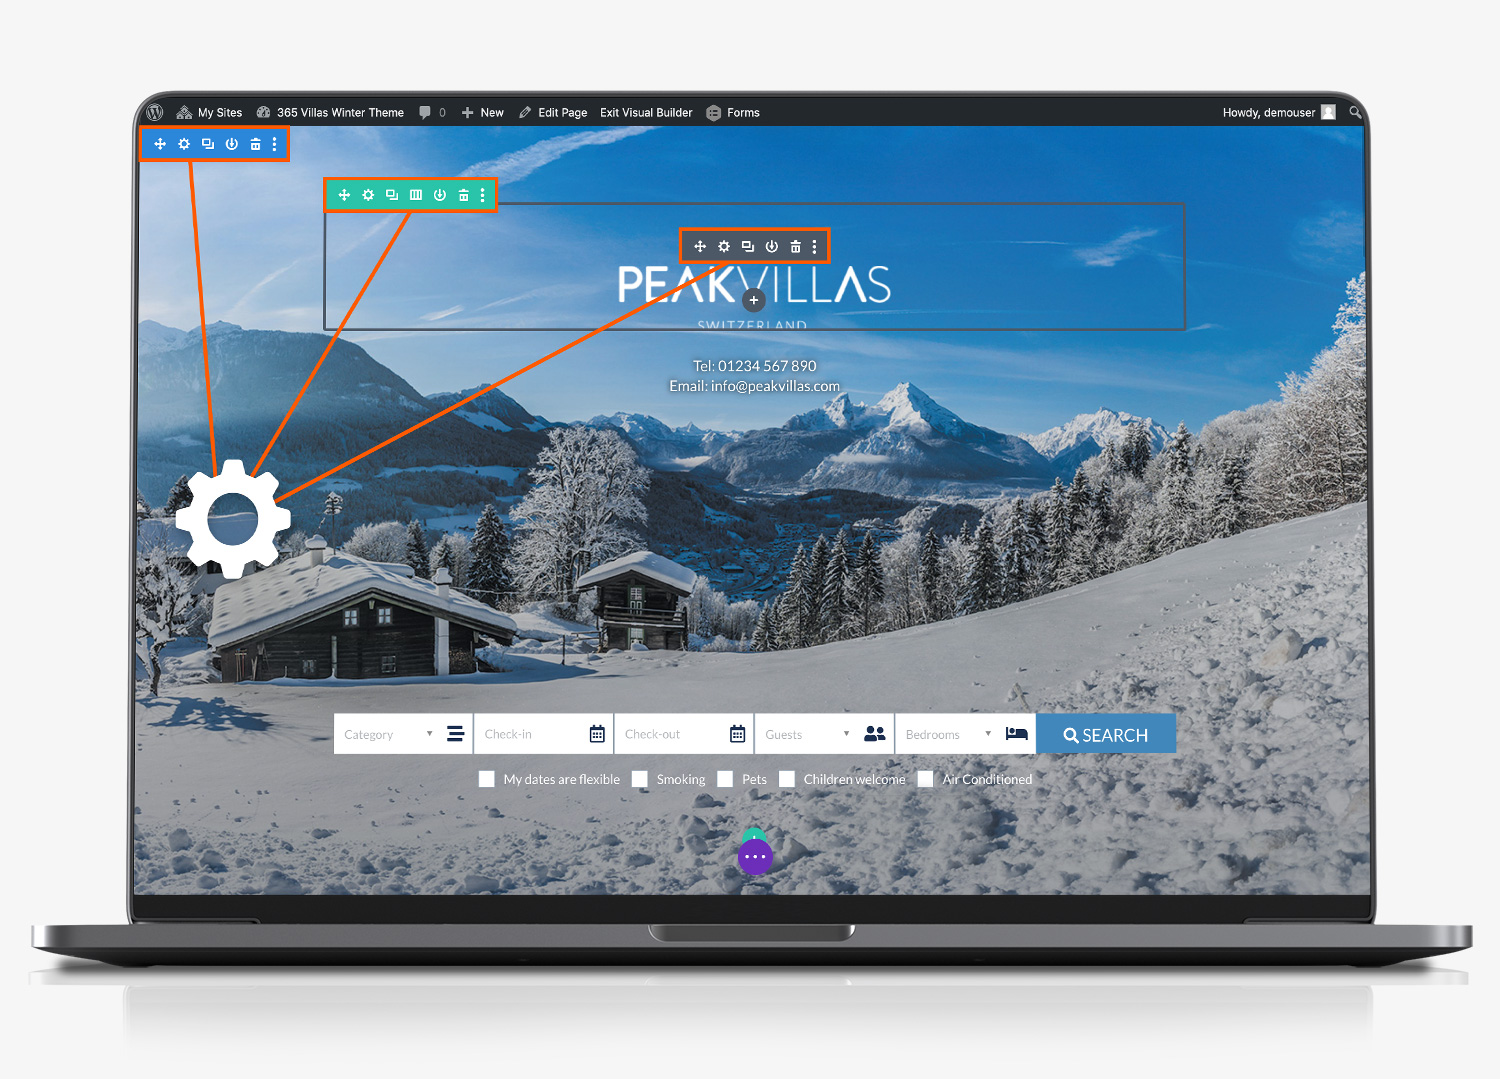
Page contains Section/Row/Module Settings –
The first thing that you will notice, is that sections are highlighted as you move your mouse over them. Each page consists of three main elements:
- Sections (coloured blue). The most basic and largest building blocks used in designing layouts with Divi are sections. These are used to create large groups of content, and they are the first thing you add to your page. There are three types of sections: Regular, Specialty and Full Width. Regular sections are made up of rows of columns while Full Width Sections are made up of full width modules that expand the entire width of the screen. Specialty sections allow for more advanced sidebar layouts.
- Rows (coloured green). Rows sit inside of sections and you can place any number of rows inside a section. There are many different column types to choose from. Once you define a column structure for your row, you can then place modules into a desired column. There is no limit to the number of modules you can place within a column.
- Modules (coloured black). Modules are the content elements that make up your website. Every module that Divi has can fit into any column width and they are all fully responsive.
To edit either the section, the row or the module, you need to click the gear icon to access the editor box for each. As a rule of thumb, if you are simply changing text on the page, you want to click the gear in the black ‘module section, as follows:
Edit Text Modules
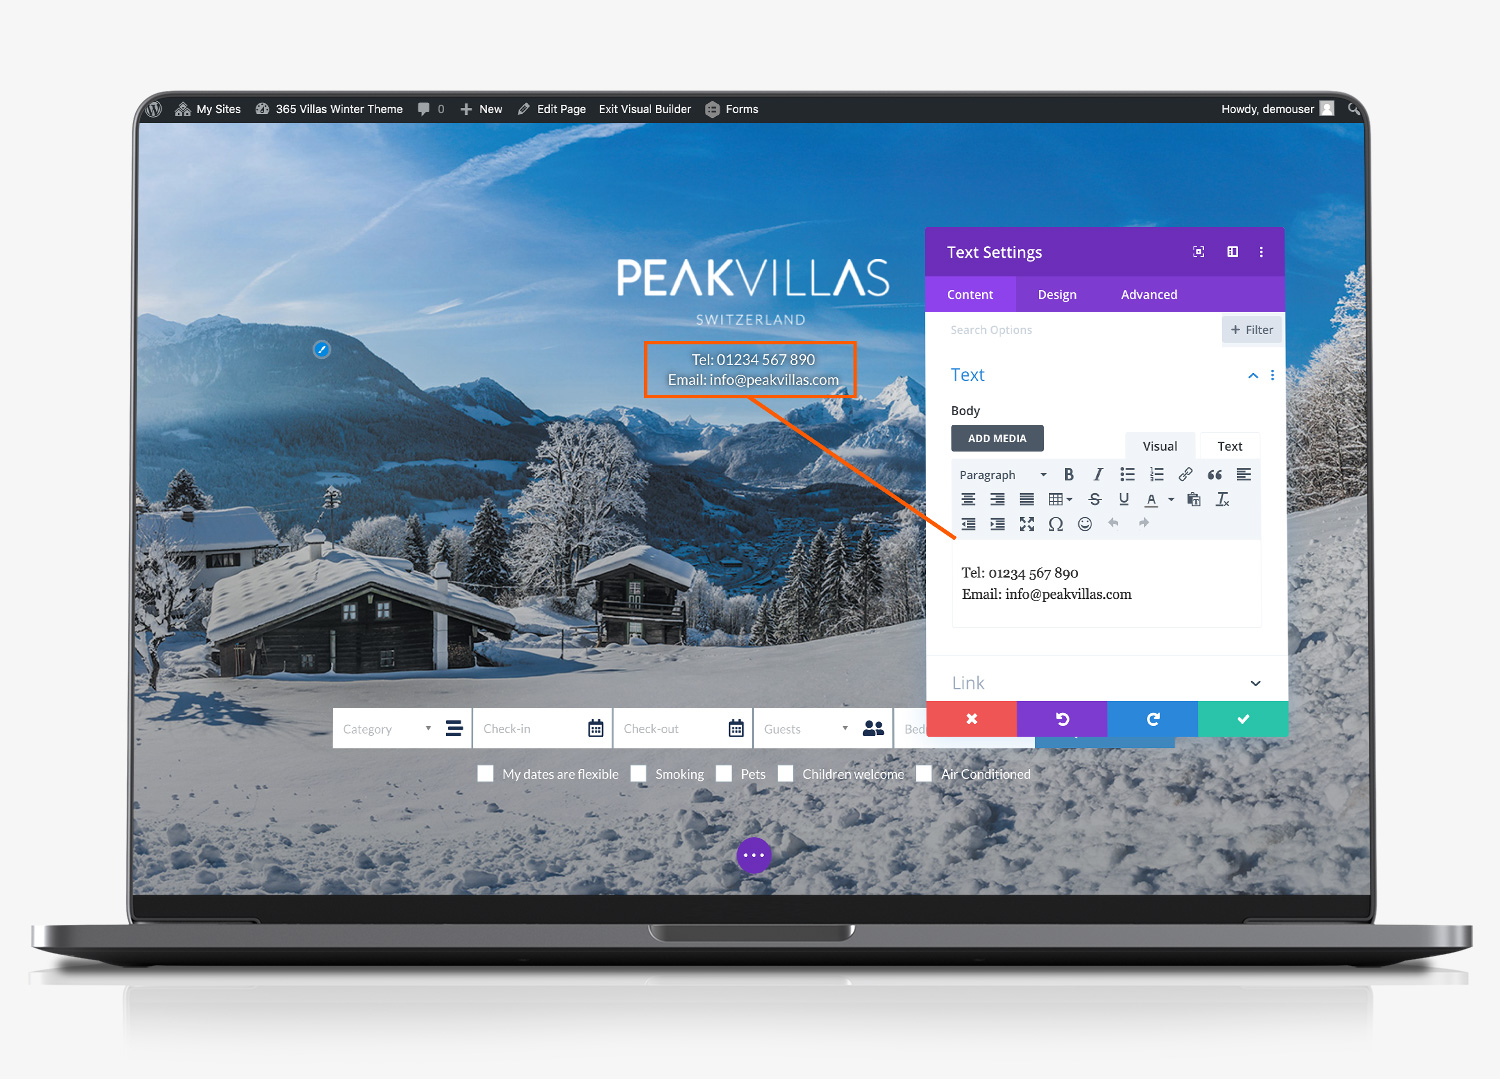
If you are editing a single column of text, the module editor will open and display the text, ready for you to edit. If the row has two columns of text, you will see both rows displayed within the module editor, with a gear icon to the left of each. Click the gear icon to edit each column.
DIVI has a number of modules that can be used within a page, so there will be slight differences, in the options available for you to edit, depending upon which module has been used. But they are all broadly similar and enable you to edit the following:
- The content of the module. Including the title (where applicable), the text and, as you scroll down the module editor, the link, the background to the module and the admin label.
- The second tab in the module is the ‘design’. From here you can override the theme settings including text and header fonts, module sizing, spacing, border and more. Unless you want to make extensive changes to a layout for a page, you are unlikely to need to change the module design.
- The final tab on the module editor is ‘advanced’. For advanced users you can apply custom CSS styles to the module, control the visibility of the module on a desktop, tablet and phone and apply transitions to the module as it comes into view.
Edit Background Image
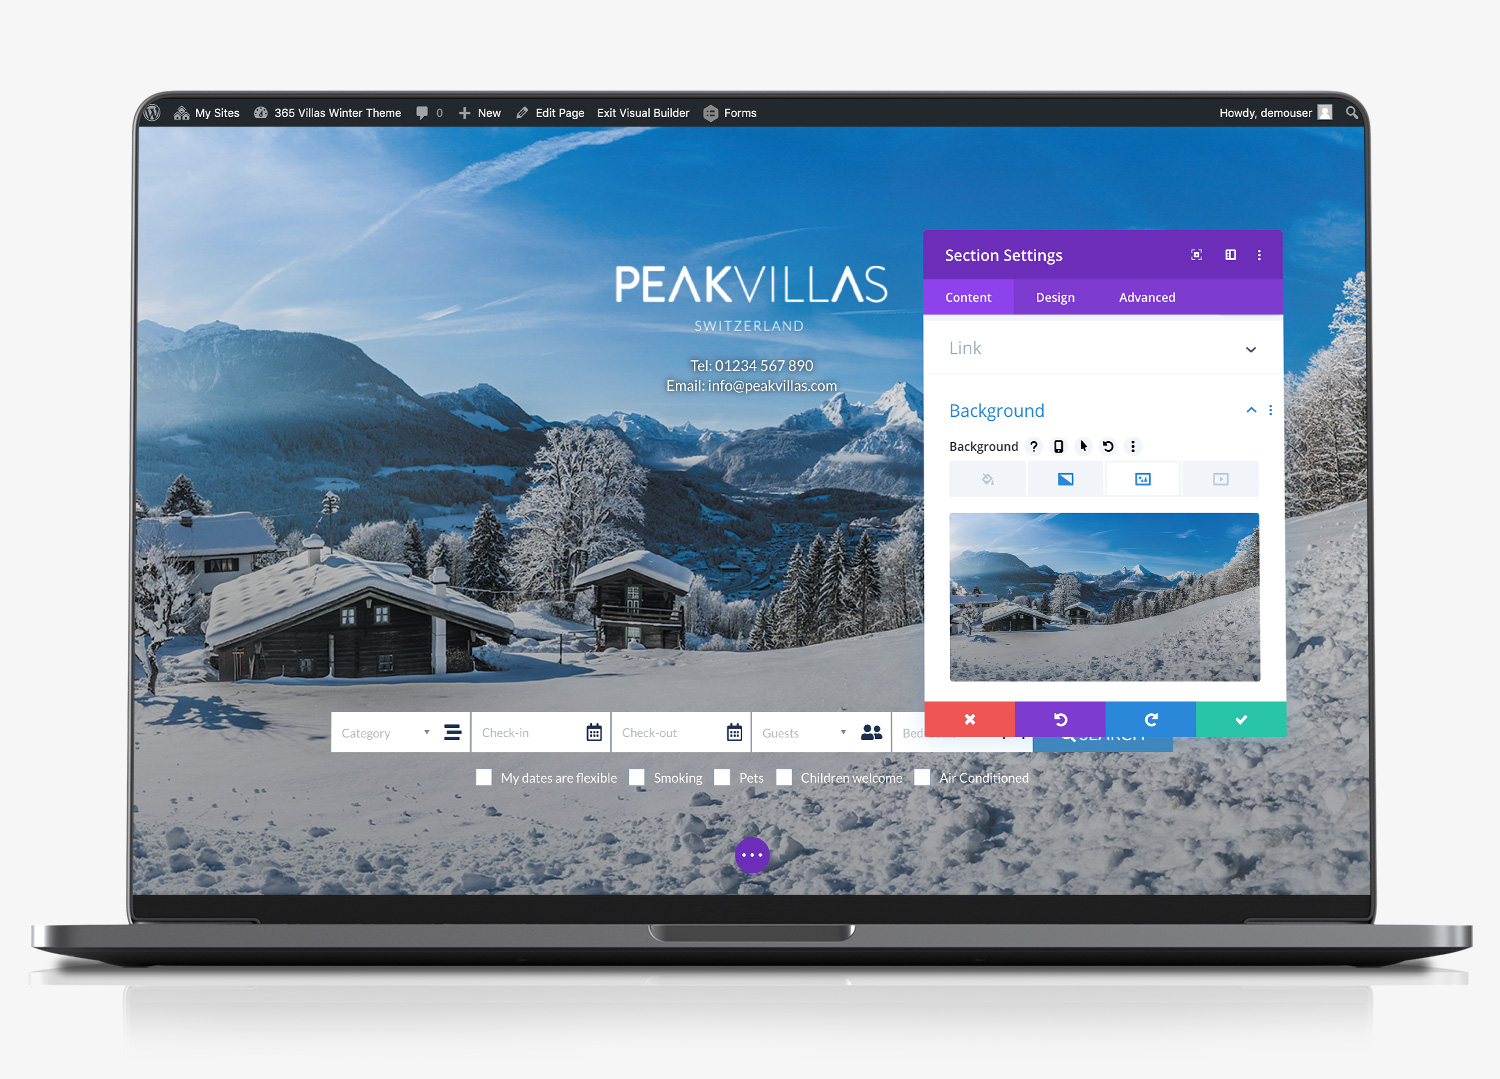
Your website includes a number of large images that fill the full width of the screen. These images are controllable at a section level. Hover your mouse over the image and select the outer (highlighted blue), cog wheel. This enables you edit the section settings. Expand the background section and you will see the background image that has been used. To change the image, hover your mouse over it (the image) and click the cog wheel that appears on the top right of the image. This loads the media library for your website.
Select from Media Library
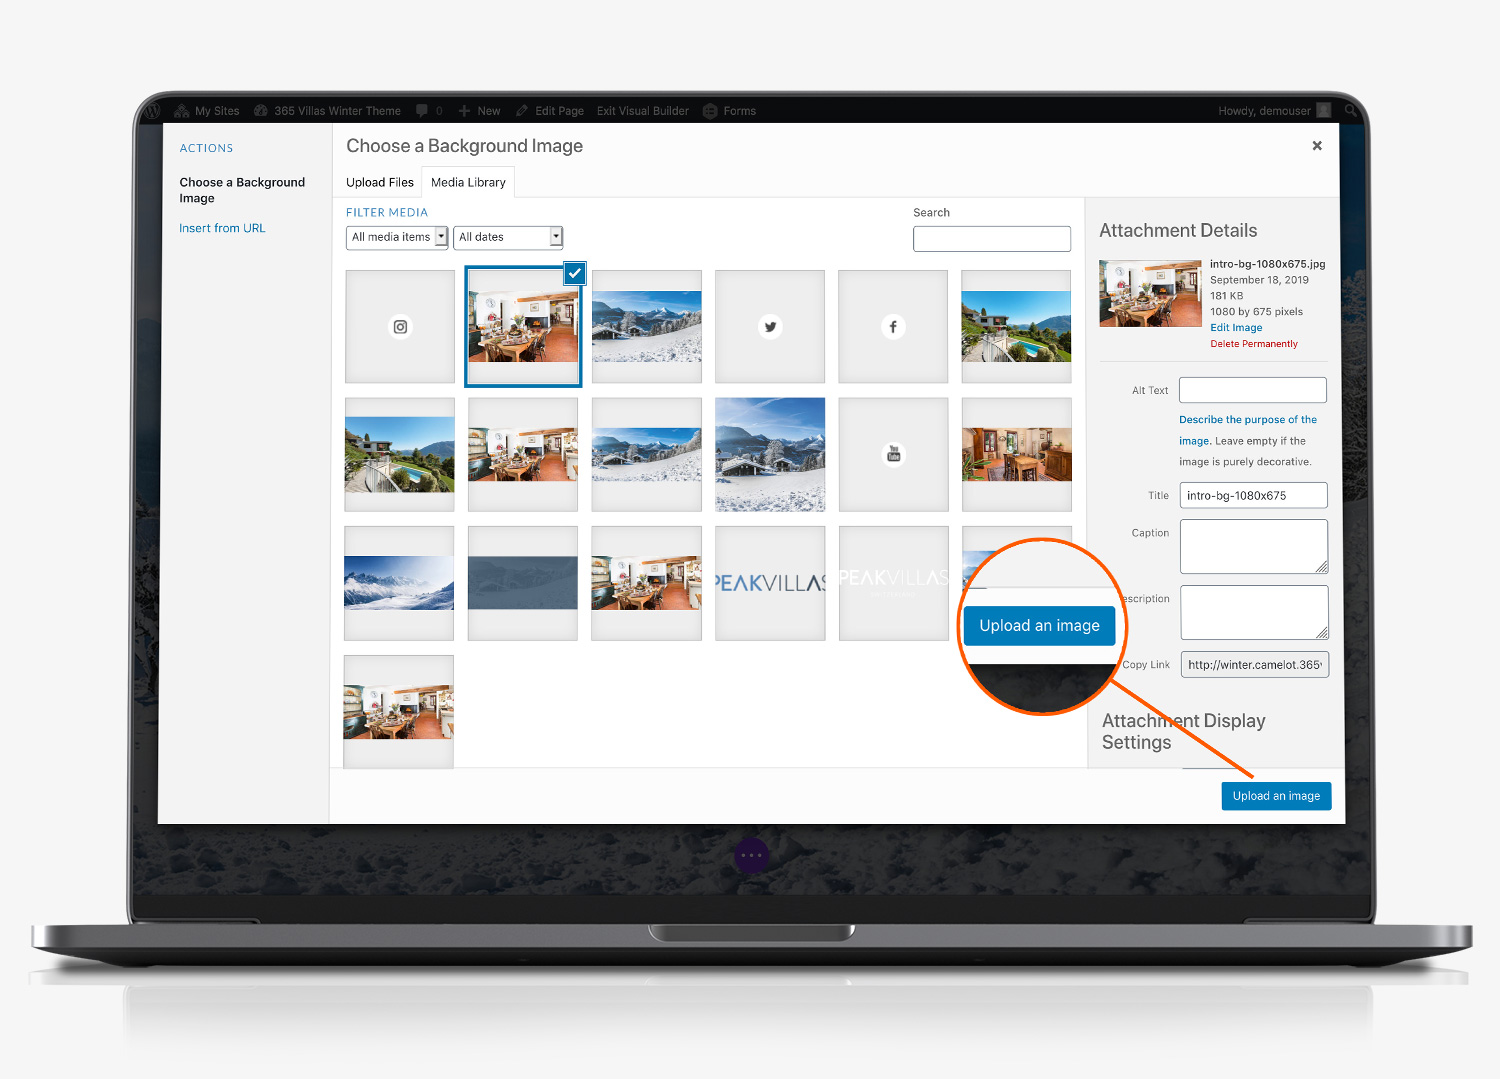
Select (or upload) the image that you want to use instead. For large background images we recommend that the image you choose is 1600 to 2000 pixels wide. Anything larger than this will be slow to load. If you don’t have any photo editing software there are free online tools you can use such as PIXLR, owned by Google.
Confirm image Choice
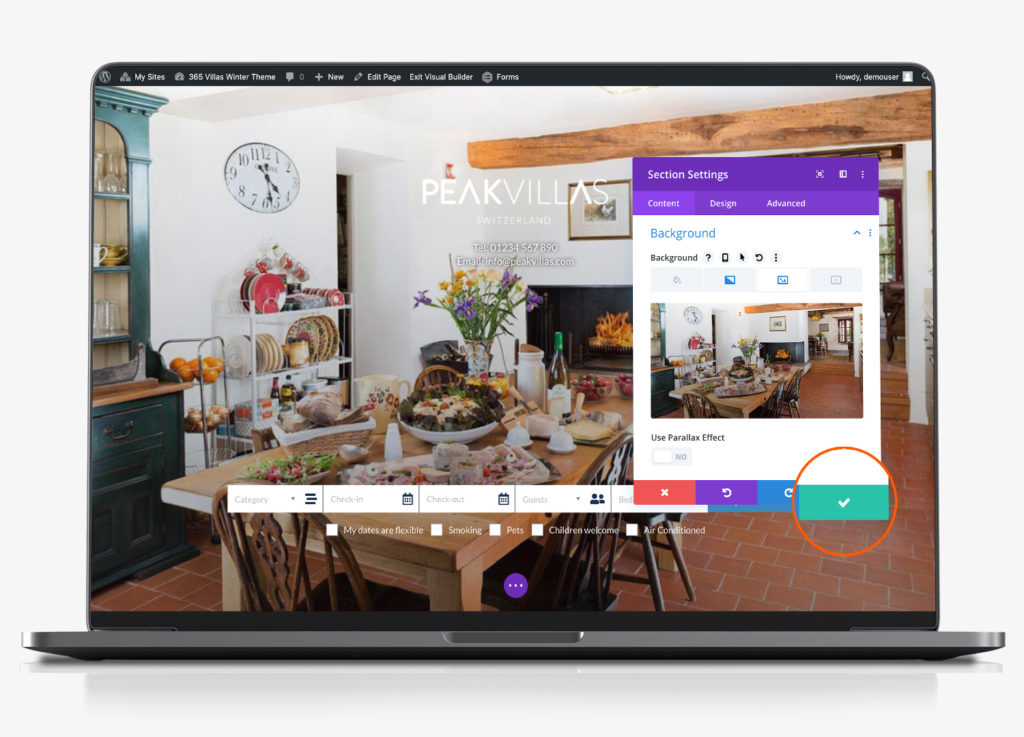
Once you have loaded your new background image, click the tick box, to confirm your choice.
Edit Image Modules
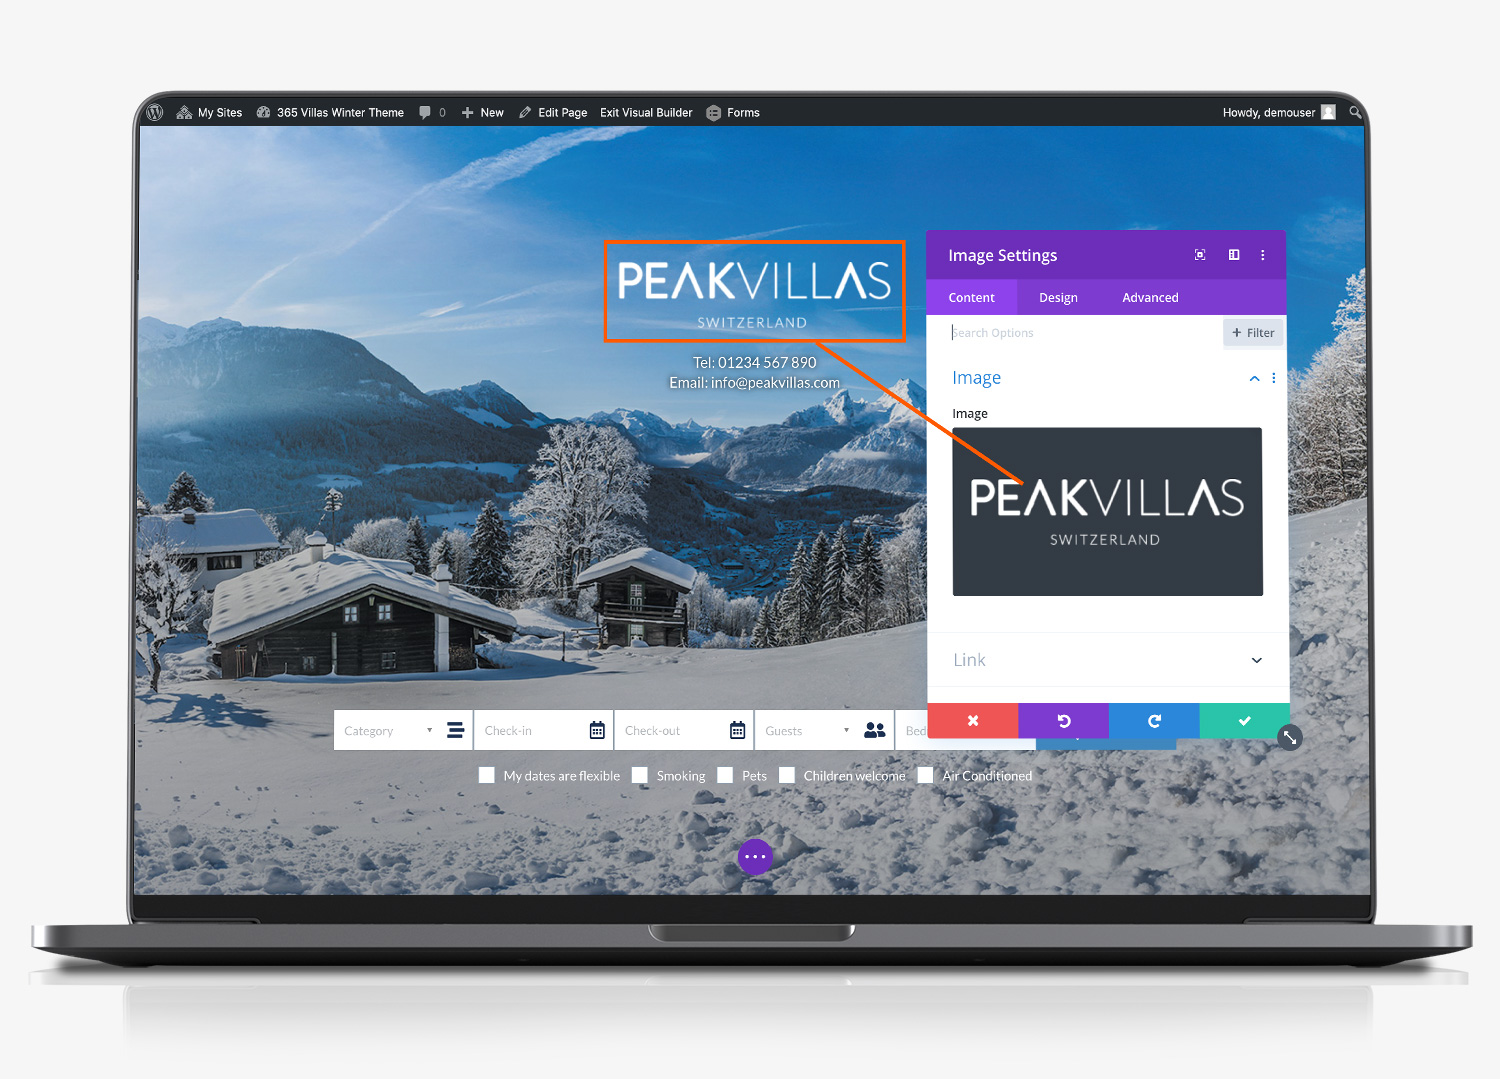
Smaller images, such as the logo on the homepage of your website, or images contained with the about us section of your website are managed at a module level. Hover your mouse over the image and select the black cog wheel to manage the image settings.
Once the module editor has loaded, hover your mouse over the image and click the cog wheel to load the image library. Select the image you want to use instead.
Edit Slider Banners
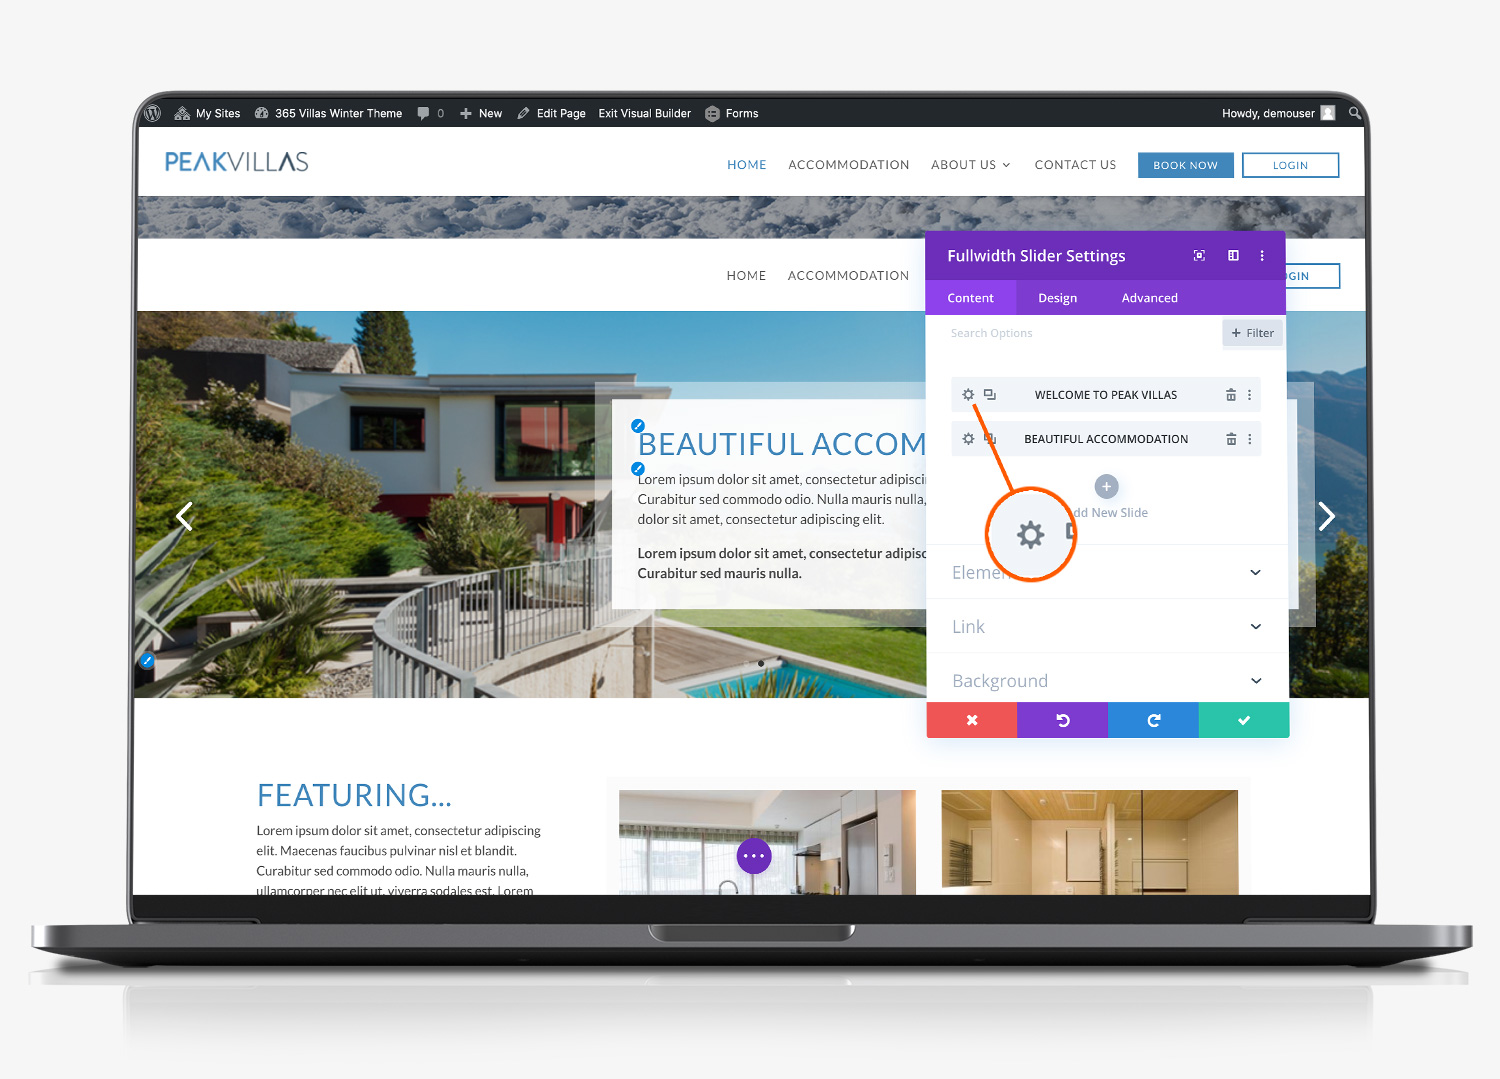
On the homepage, you have a section which includes a slider banner with a text box over it. Whilst this section includes full width images, this is actually a module. To edit it, hover your mouse over the section and select the black cog wheel for the module.
By default, the module has two sliders. You can add more by clicking the ‘+’ add new slide link. Select the cog wheel next to the slider you want to edit. You can now edit the following sections for each slider:
- Slider title
- Button title (if you want to add one)
- Body text of the slider
- Scroll down further and you can also edit the background image
Background Image
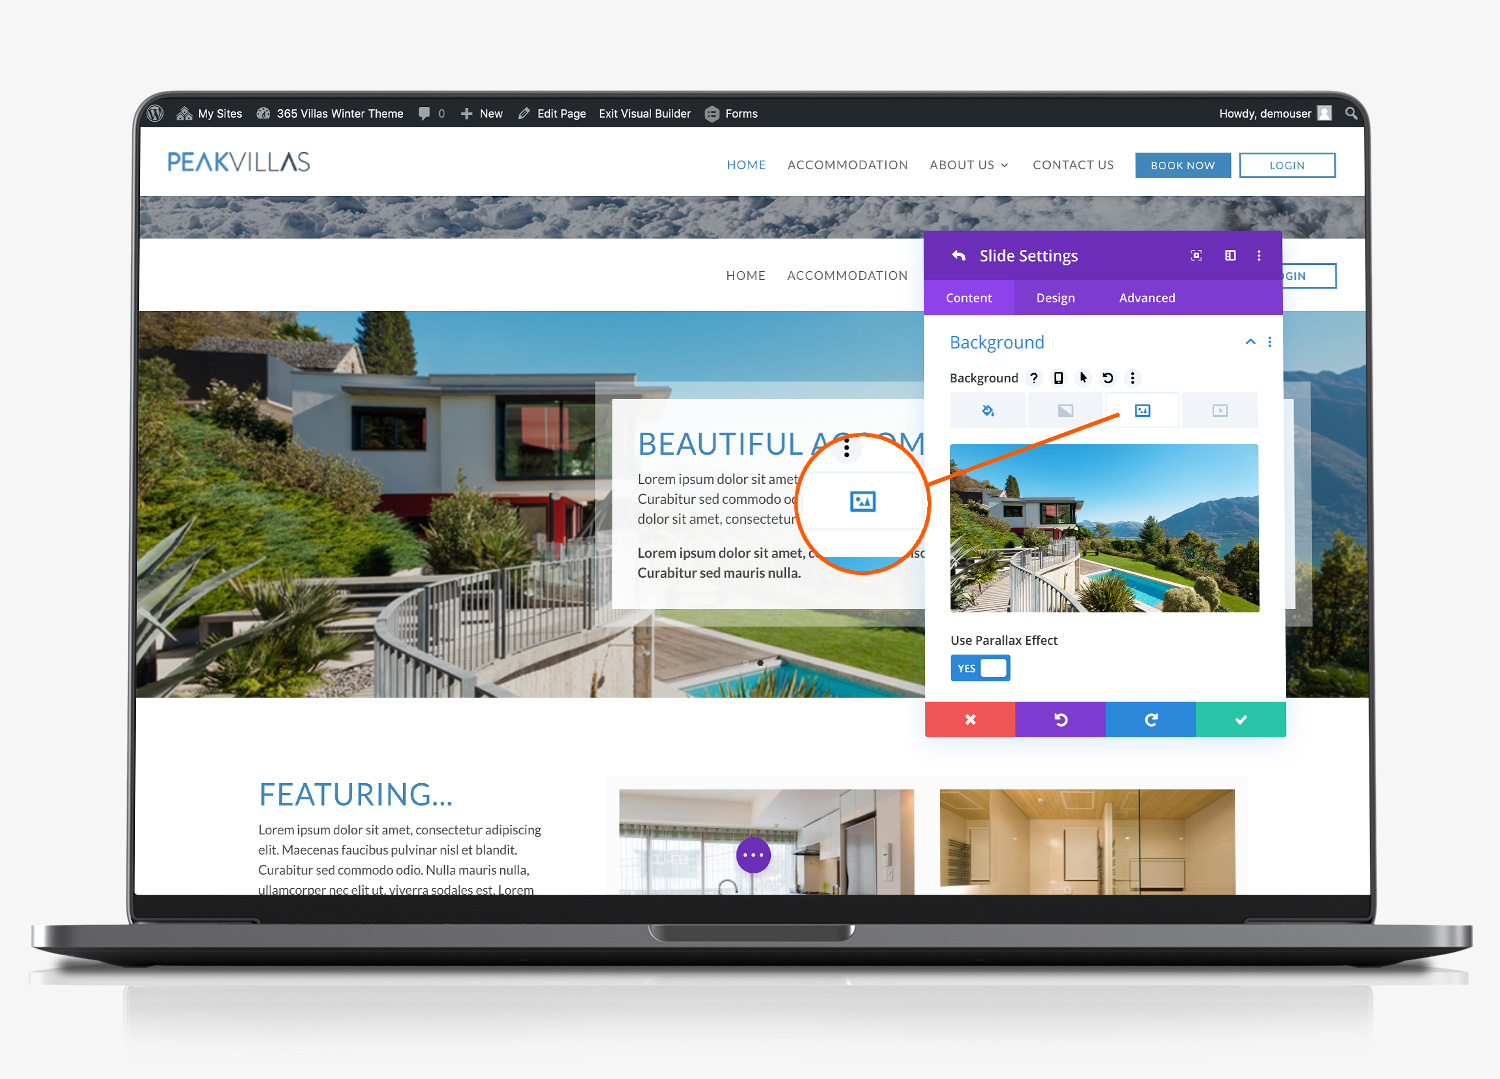
Below the text section you will see the following:
- Images and video. In this theme, we are not using this setting. If you did select an image or video here, it would replace the text box over the slider.
- Link. If you want to apply a hyperlink to the slider, eg to link to a particular page on your website, add the URL-slug to the ‘Module Link URL’. If you are linking to an external website, you will need to include the full page url eg https:// etc.
- Background. As the slider in your theme is full width, within this module it is controlled as a background image. Click the arrow to expand the background selection and selection the image icon to see the background image. Hover over the mage and click the cog wheel to select (or upload) the image from the media library that you want to use.
Edit/Disable Special Offer
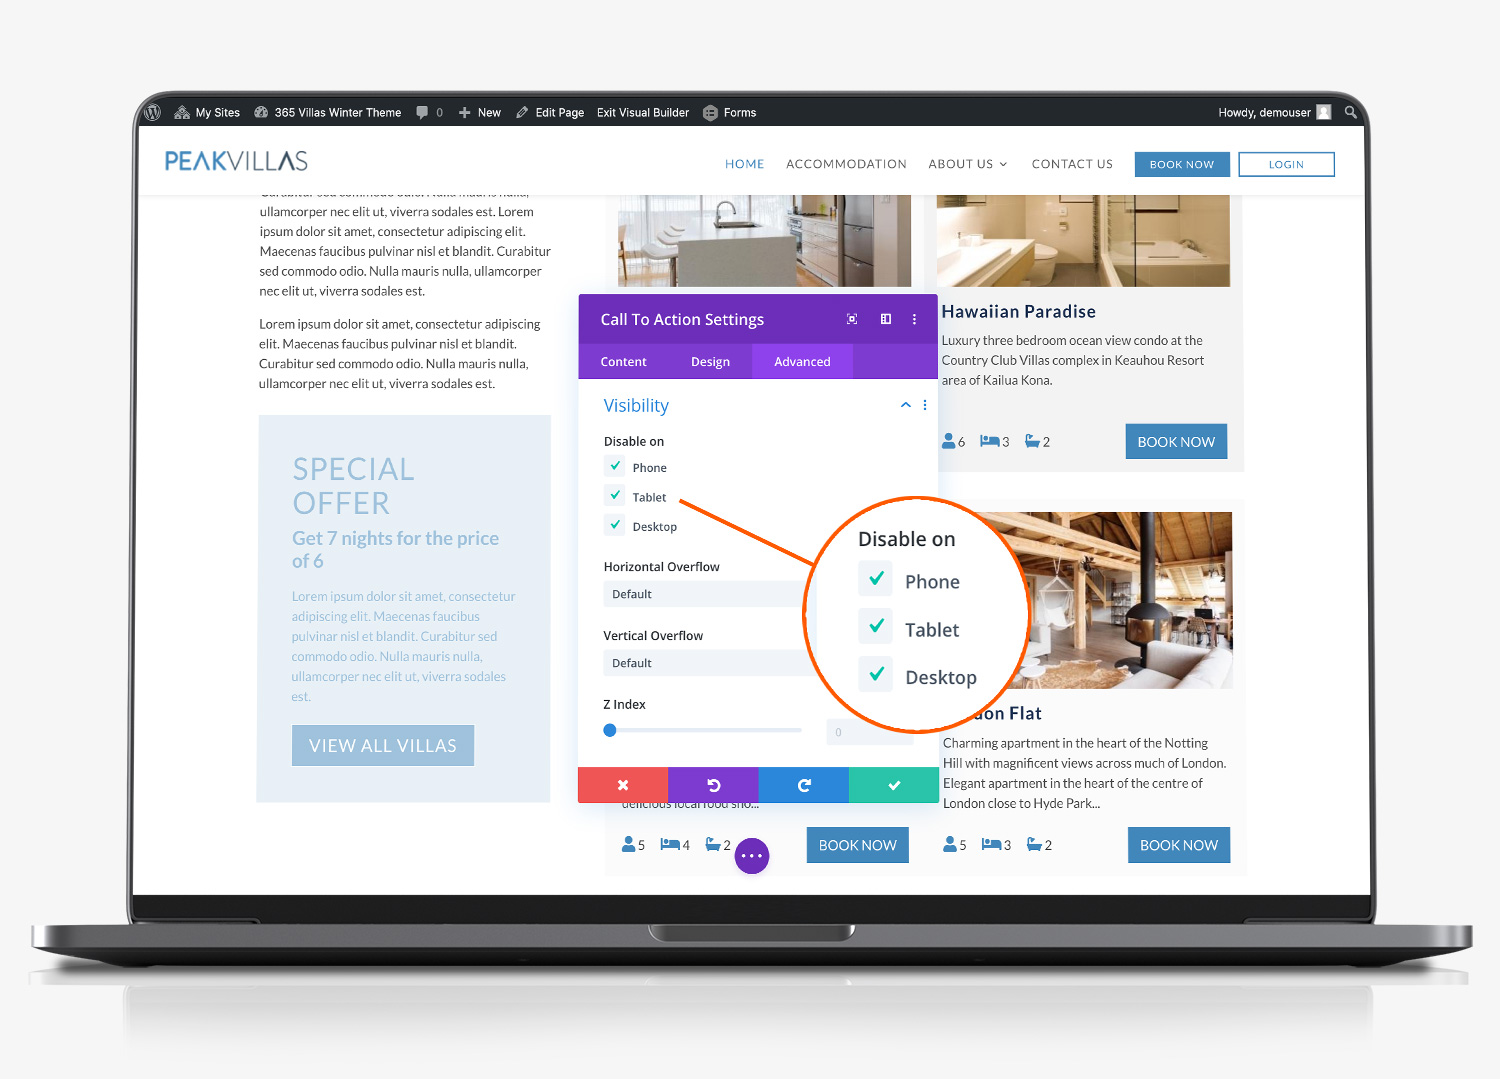
The special offers section is an optional extra included within your theme. If you do not need this section it can be hidden as follows:
- Hover over the section and select the black cog wheel to load the module editor.
- Click the ‘advanced tab’
- Click to expand the ‘visibility’ section and click to disable on phone, tablet and desktop. You will still see this section when you edit the page, but visitors will not be able to see it.
We don’t recommend deleting the module (although this is an option) in case you want to use it in the future.
To edit the special offers section, select the ‘content’ tab from the module editor from where you can edit the text, the module link and the background colour.
Edit Button Text/Links
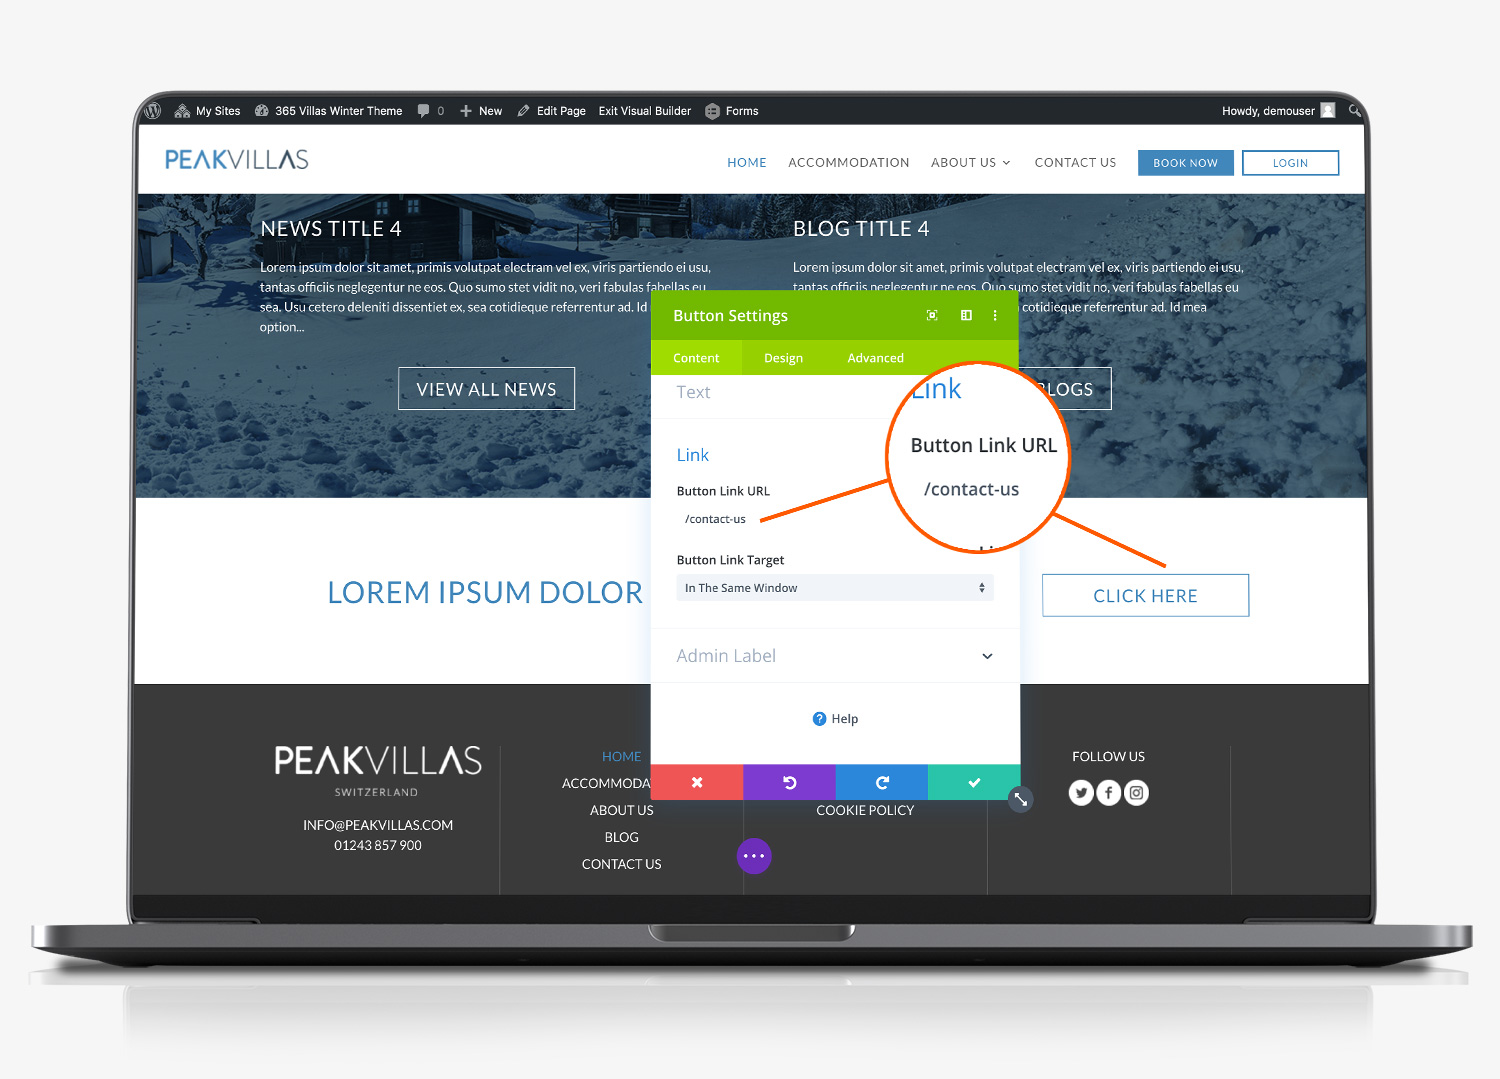
Several pages on your website include a ‘call to action’ section above the footer of your website. As you hove over this section, you will notice that it highlights a bright green colour. This means that this is a global section. If you edit this section, it will automatically be updated on other page sthat feature this global section.
To edit the call to action text, select the inner green cog wheel for the text module. Change the text and click the green tick to confirm the change.
To change the button link, hover your mouse over the button and select the green cog wheel, to bring up the button settings module editor. From here your can change the button text and the link URL.
Restructure Photos (overview)
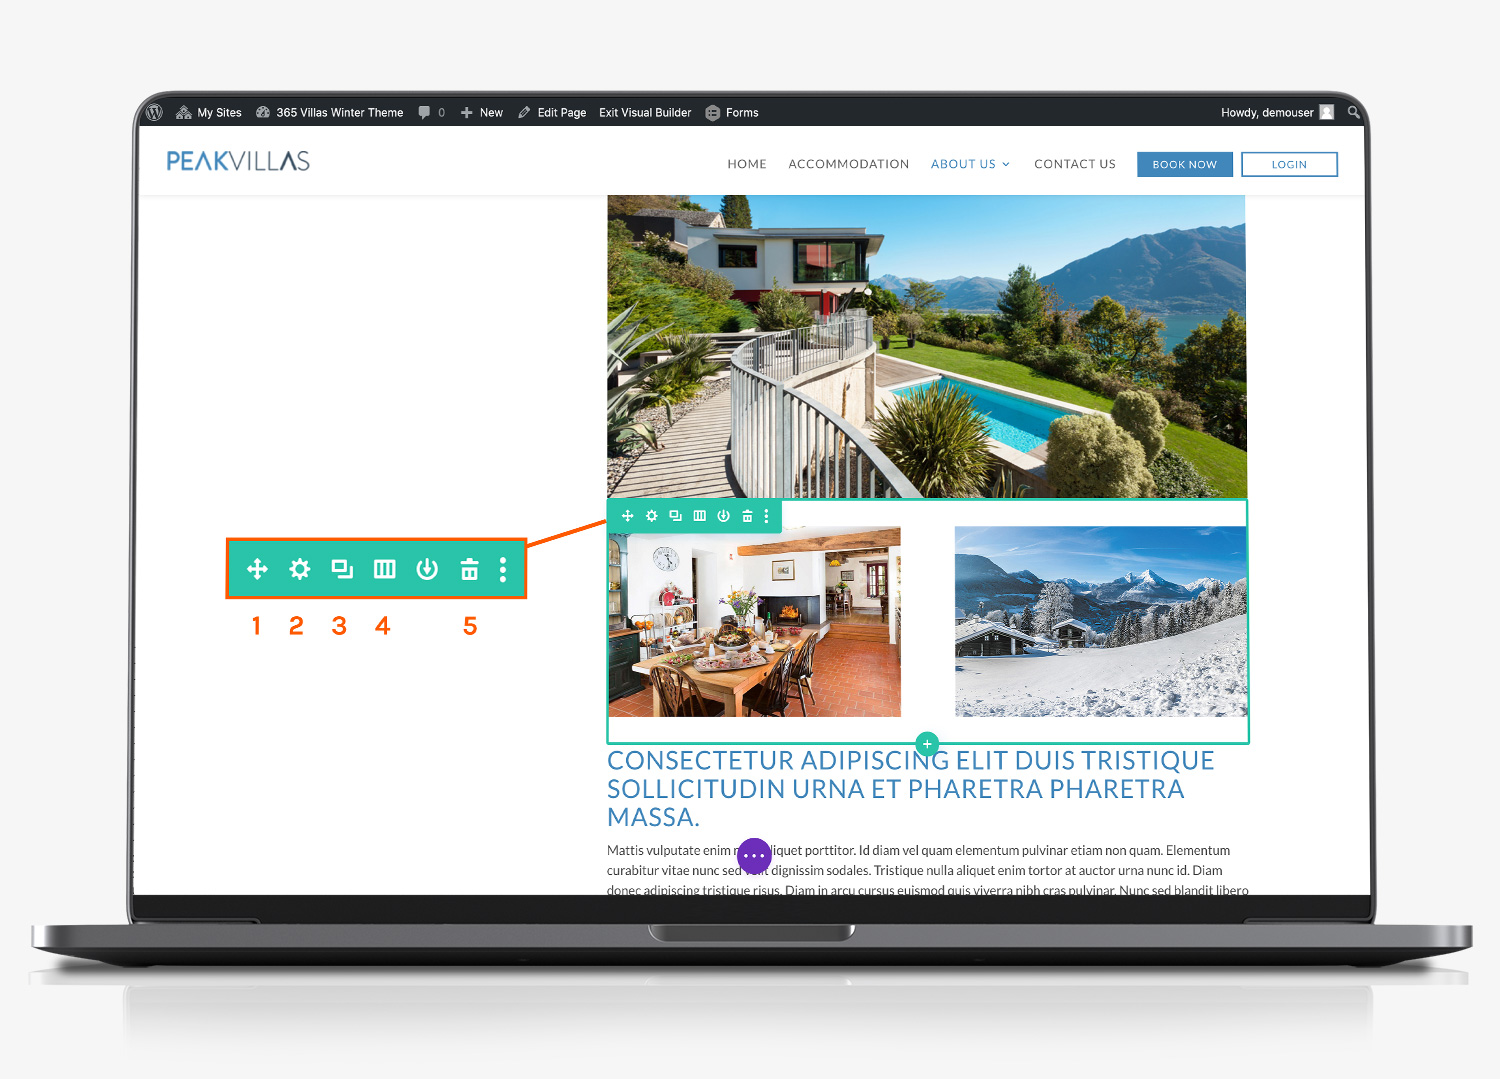
1. Drag 2. Settings 3. Duplicate 4. Column Structure 5. Delete – Lorem ipsum dolor sit amet, consectetur adipiscing elit, sed do eiusmod tempor incididunt ut labore et dolore magna aliqua. Ut enim ad minim veniam, quis nostrud exercitation ullamco laboris nisi ut aliquip ex ea commodo consequat. Duis aute irure dolor in reprehenderit in voluptate velit esse cillum dolore eu fugiat nulla pariatur. Excepteur sint occaecat cupidatat non proident, sunt in culpa qui officia deserunt mollit anim id est laborum.
Edit Column Structure
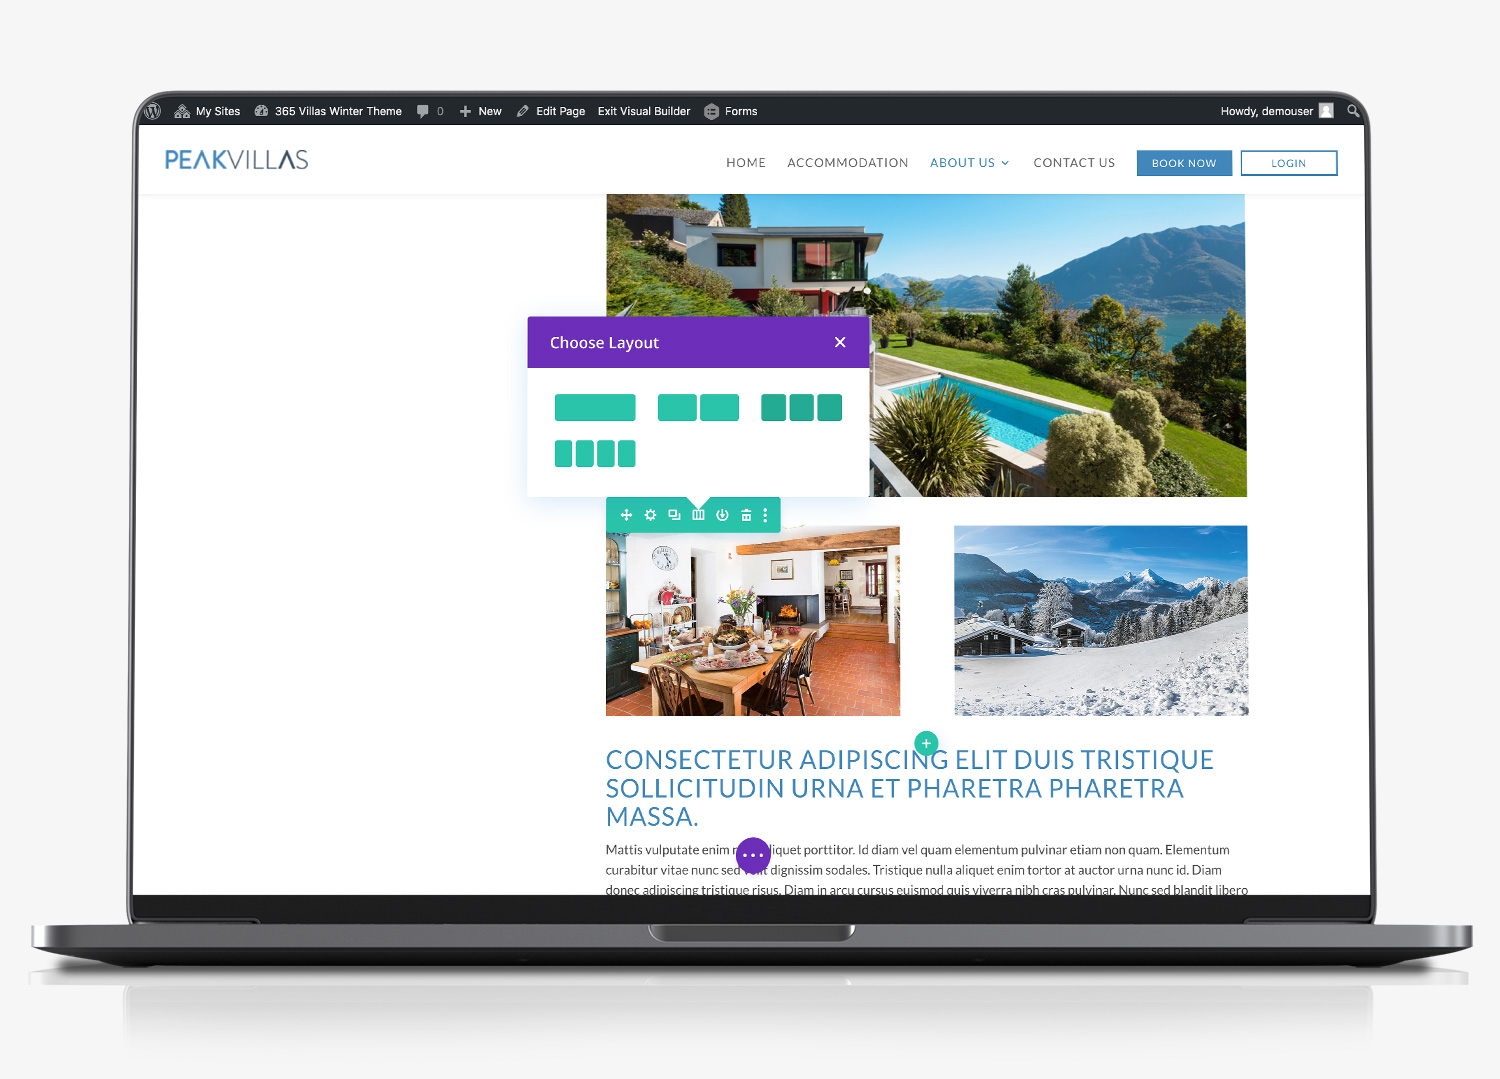
Lorem ipsum dolor sit amet, consectetur adipiscing elit, sed do eiusmod tempor incididunt ut labore et dolore magna aliqua. Ut enim ad minim veniam, quis nostrud exercitation ullamco laboris nisi ut aliquip ex ea commodo consequat. Duis aute irure dolor in reprehenderit in voluptate velit esse cillum dolore eu fugiat nulla pariatur. Excepteur sint occaecat cupidatat non proident, sunt in culpa qui officia deserunt mollit anim id est laborum.
Add new image module
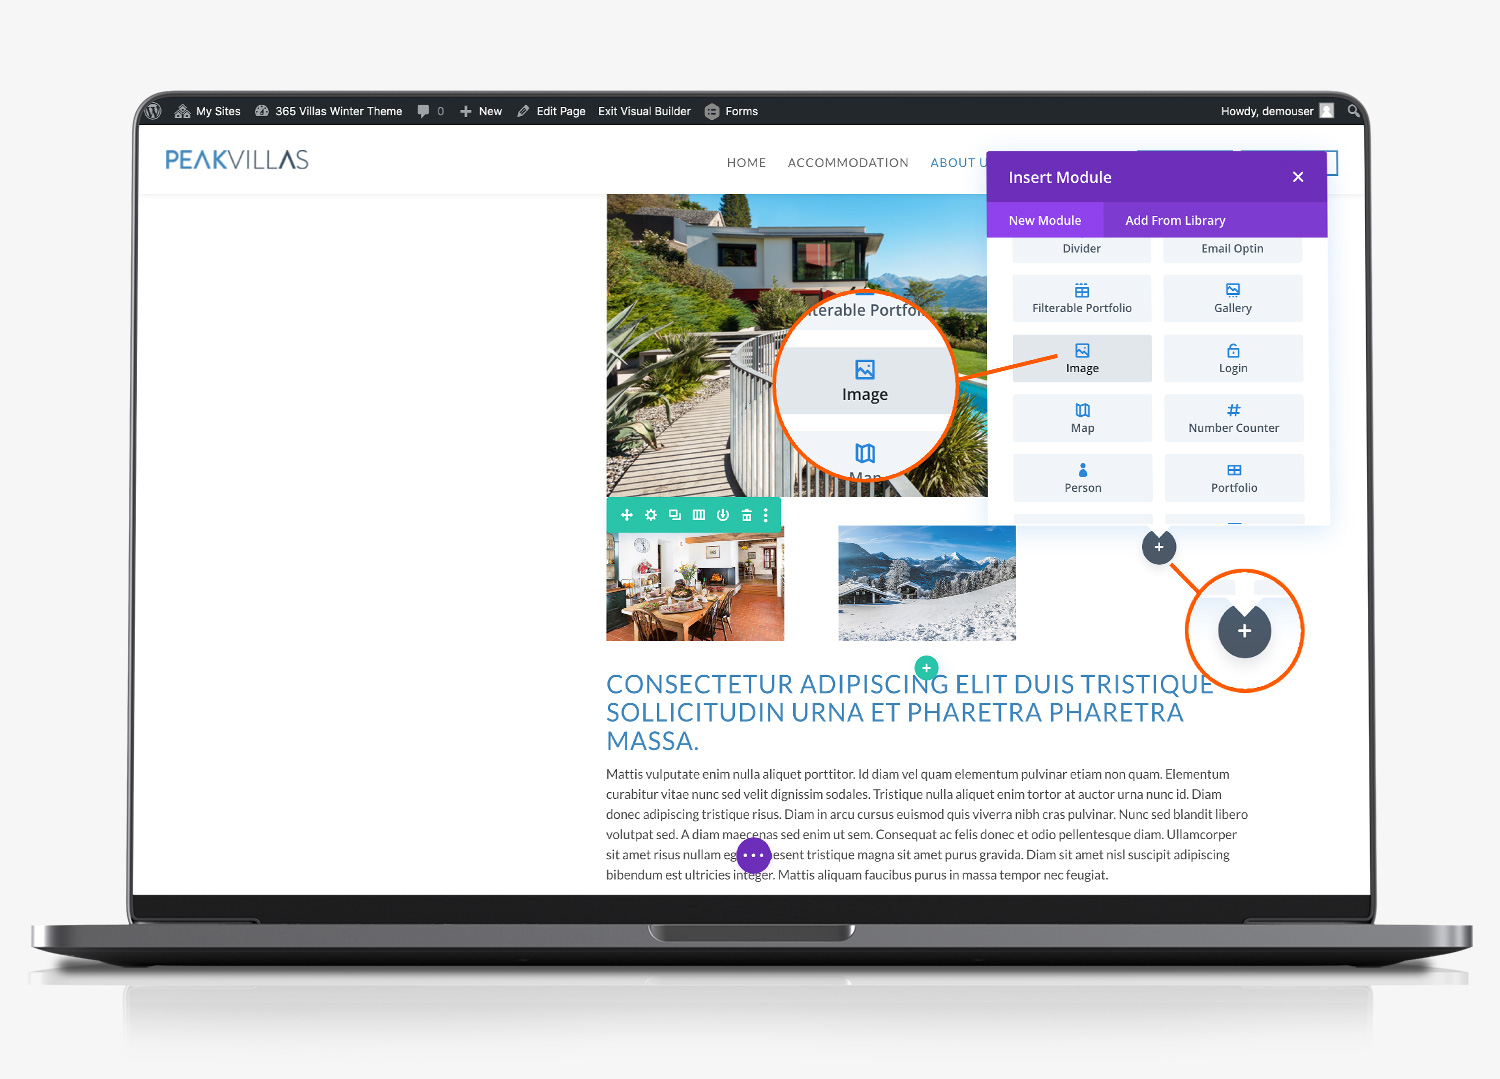
Lorem ipsum dolor sit amet, consectetur adipiscing elit, sed do eiusmod tempor incididunt ut labore et dolore magna aliqua. Ut enim ad minim veniam, quis nostrud exercitation ullamco laboris nisi ut aliquip ex ea commodo consequat. Duis aute irure dolor in reprehenderit in voluptate velit esse cillum dolore eu fugiat nulla pariatur. Excepteur sint occaecat cupidatat non proident, sunt in culpa qui officia deserunt mollit anim id est laborum.
Change Heading Size
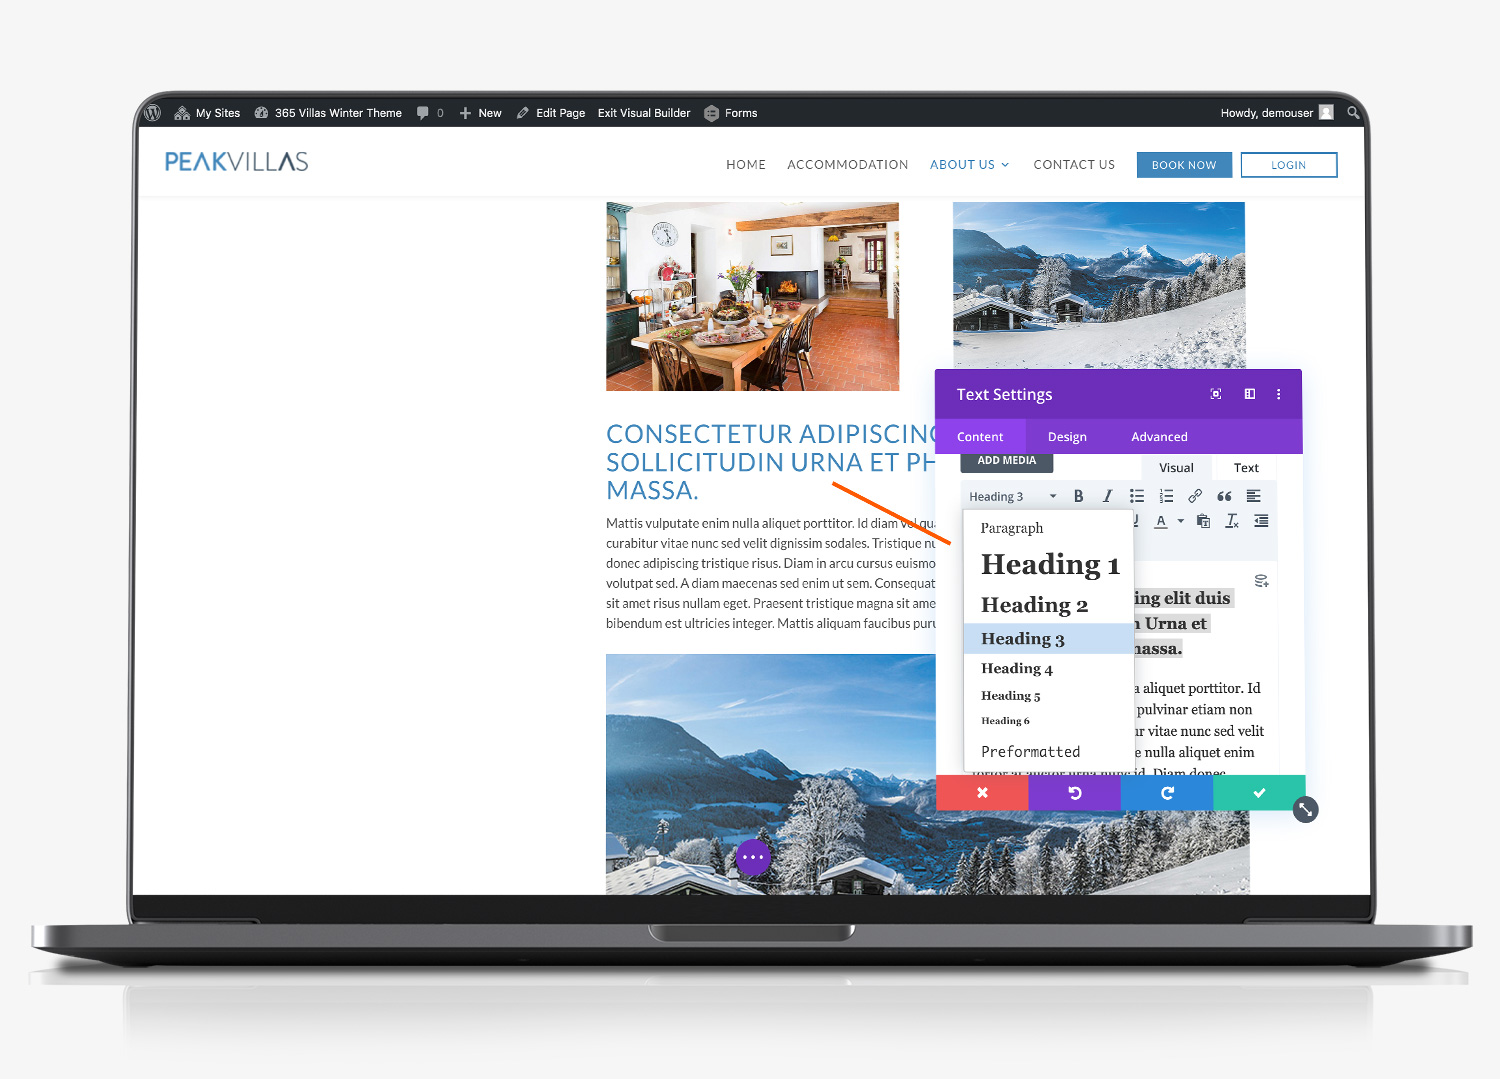
Lorem ipsum dolor sit amet, consectetur adipiscing elit, sed do eiusmod tempor incididunt ut labore et dolore magna aliqua. Ut enim ad minim veniam, quis nostrud exercitation ullamco laboris nisi ut aliquip ex ea commodo consequat. Duis aute irure dolor in reprehenderit in voluptate velit esse cillum dolore eu fugiat nulla pariatur. Excepteur sint occaecat cupidatat non proident, sunt in culpa qui officia deserunt mollit anim id est laborum.
