INDEX
Section 1 – Configuring your properties
Section 2 – Activation Confirmation
Understanding Instant Booking and Non-Instant Booking
Unlisting or Disconnecting Properties
About the integration
Our Airbnb direct integration enables seamless synchronization of property information, rates, availability, pictures, descriptions, and more. Additional feature options such as collection of guest details, payment information, and channel commissions mark-ups are also available.
Synchronization Options
Limited Sync allows use of the Airbnb Dashboard for editing property settings and syncs specific information between 365Villas and Airbnb. Opt for Limited Sync if you prefer managing certain aspects directly within the Airbnb Dashboard.
Sync All is a comprehensive synchronization option that ensures all property information, including rates, availability, images, descriptions, etc., is synchronized from 365Villas to Airbnb. Choose Sync All if you want to update all property details based from your 365Villas account.
Managing Bookings and Payments
Guest Information Collection: When a guest reserves your property, their details are automatically collected by Airbnb, making the booking process hassle-free for you.
Reviewing Agreement and Payment Details: It’s essential to carefully check your agreement and payment particulars in your Airbnb account. Once integrated with the Channel manager, the Airbnb commission will be 15%. Make sure your bank details are accurately configured to receive payments from Airbnb.
First-Time Channel Manager Users: If you’re new to channel managers, the fee charged by Airbnb to hosts (that’s you) may vary.
Accessing Payout Information: Inside your Airbnb account, you will be able to access booking payout details for effective revenue monitoring. Total booking amounts will also be visible in 365Villas.
Applying Markup to Cover the Channel Commission
To offset Airbnb’s channel commission (15%), you can choose to mark-up to your rates. This mark-up is calculated as a percentage tol be added on top of the nightly rent amount.
Connection Process
You can manage all settings from your 365Villas account.
Existing clients: Only host accounts can be connected. It is not possible to connect a co-host account.
New clients: Follow the steps on the system before initiating the connection.
Section 1 – Configuring your properties
Before you initiate the connection process, ensure your properties are ready.
You must have pricing set-up on your 365Villas rates table going at least 12 months into the future for your property to stay active on Airbnb. Ensure your 365Villas calendar is up to date, in terms of booking and blocks, to avoid any possible overbookings, and property content must be complete. Check the Property Status area to confirm all your properties are ready for connection.
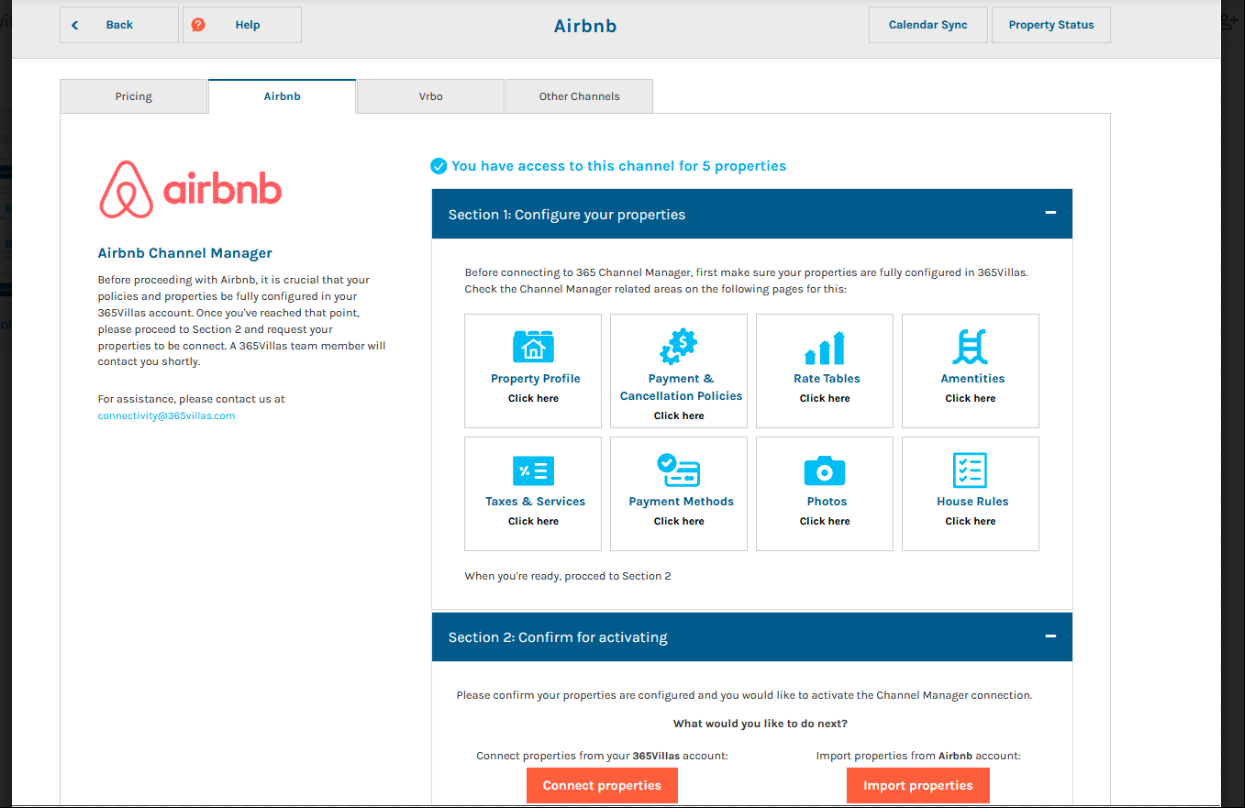
Section 2 – Activation Confirmation
Follow these steps to activate the connection:
- Click on the “Connect properties” button to be redirected to the Airbnb connection page.
- Our team will review your request and grant access for you to proceed.
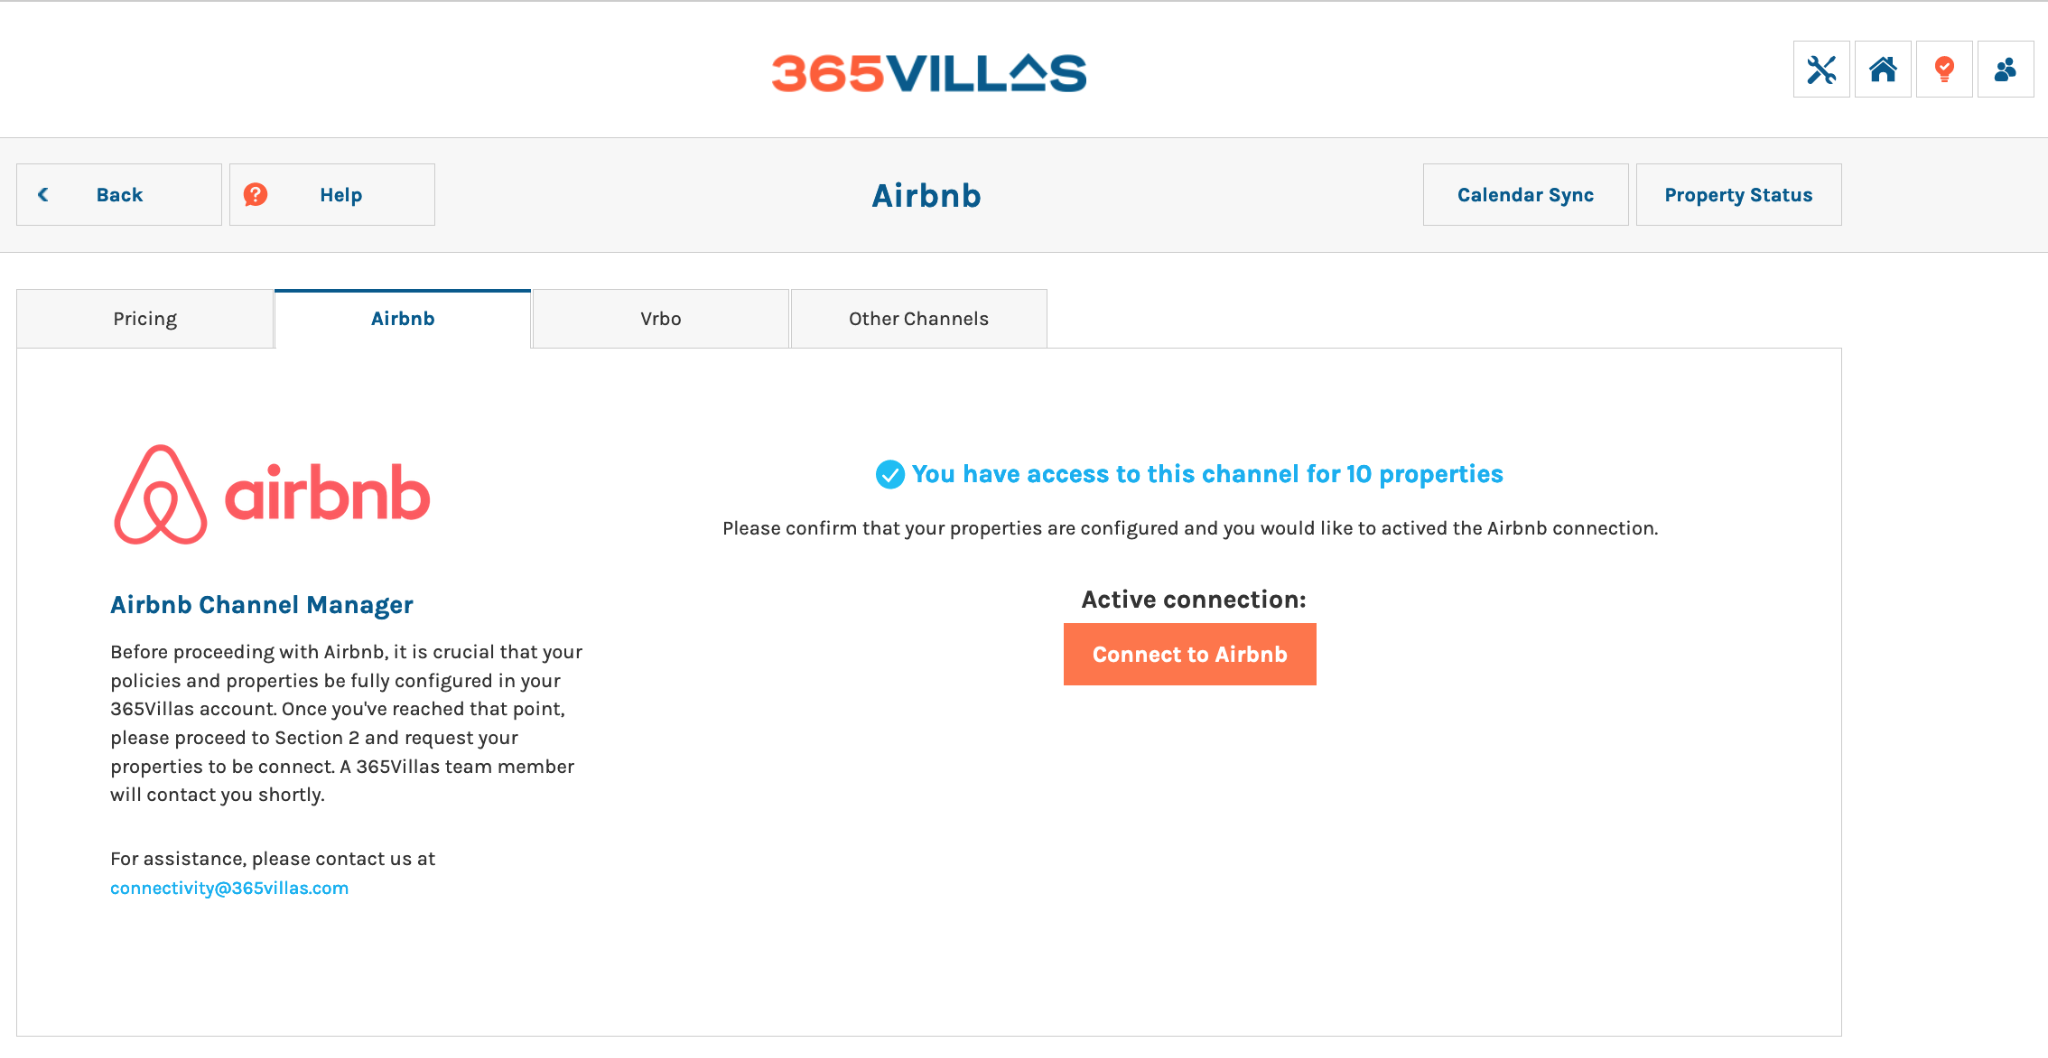
Once approved, follow these steps:
- Click on “Connect to Airbnb.”
- The system will redirect you to your Airbnb listing page. If you are not already logged in, Airbnb will prompt you to log in.
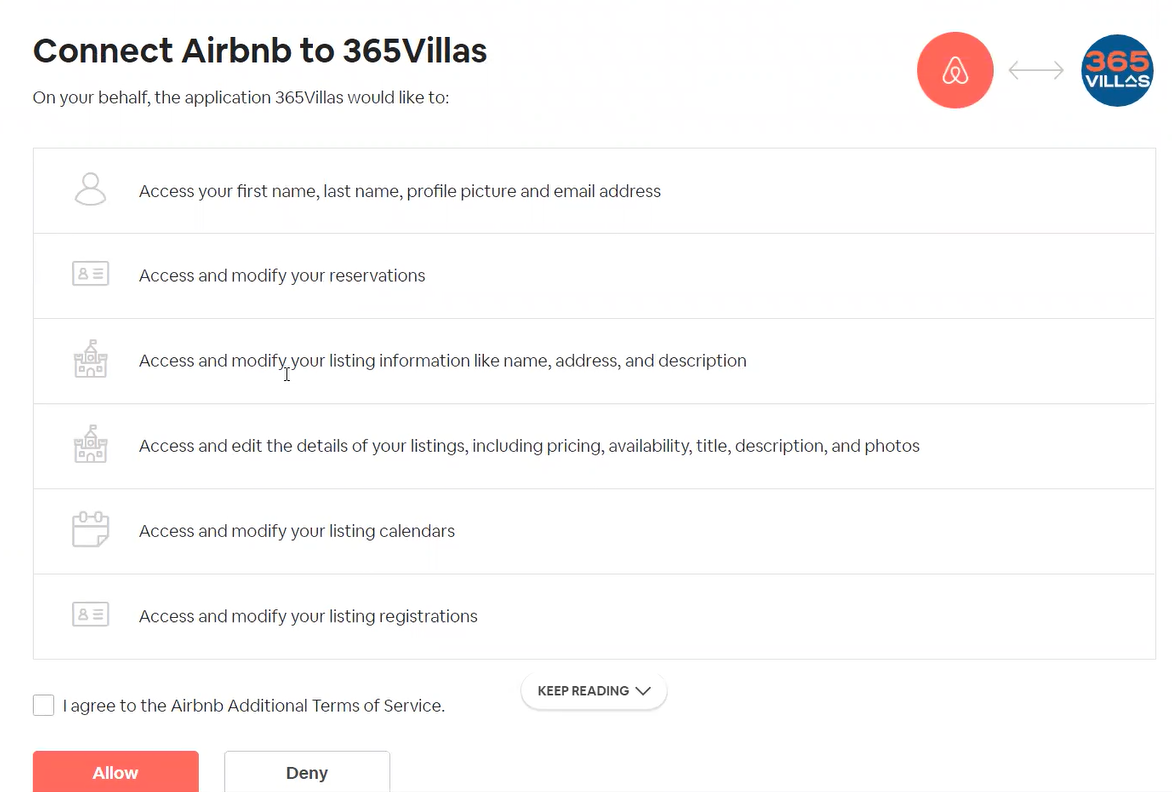
- To establish the connection with 365Villas, provide access to your Airbnb account information, accept the terms and conditions, and then grant the necessary permissions for the connection.
If an error occurs during the process, ensure that you are not using the wrong account to log in, and verify that another Property Management System (PMS) is not already connected.
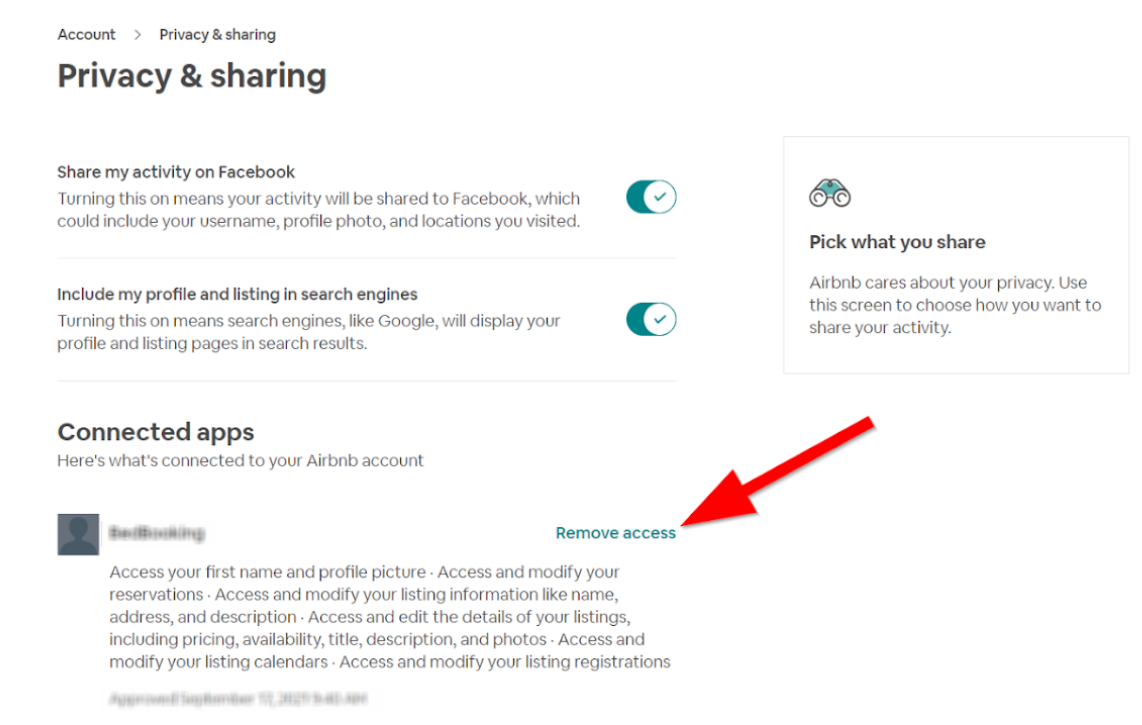
Once you are successfully connected, the system will display four tabs:
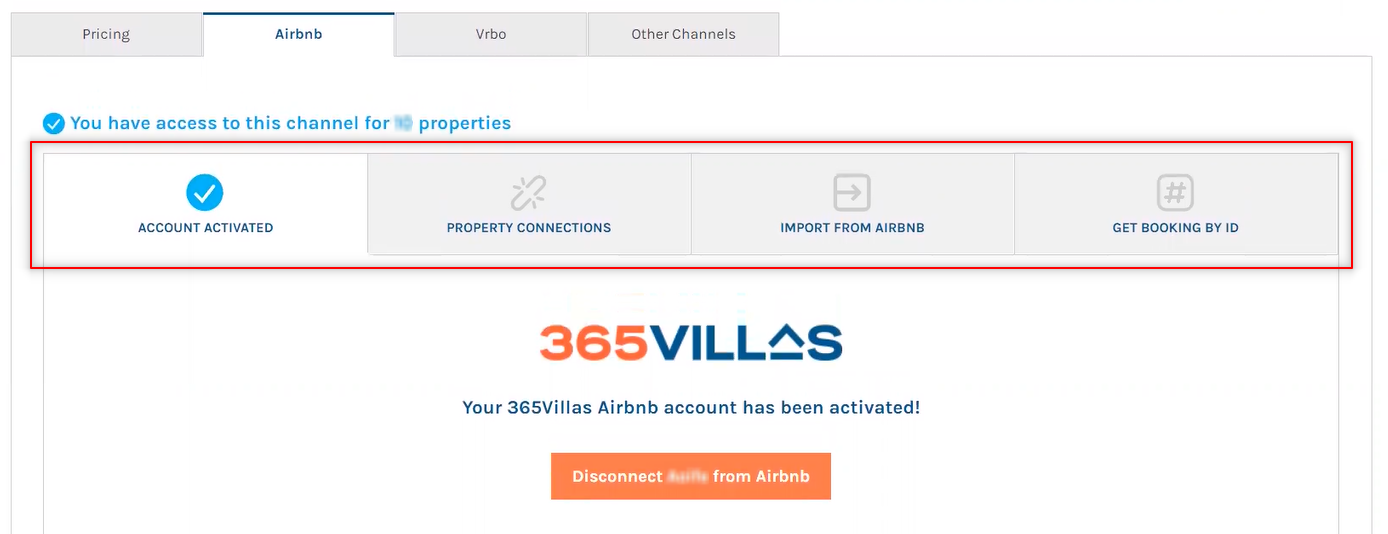
Account Status
At this point, access has been granted. However, no changes have been implemented, and the properties are not yet live on the platform.

If You Choose to Disconnect Your Account
Should you decide to disconnect your account at any time, it will be necessary to initiate the connection process from the beginning to re-establish the link.
Property Connections
This section allows you to start linking your properties. To do so, follow these steps:
If you have multiple Airbnb accounts connected, select the appropriate one from the list on the left-hand side.
Click on “Add Property” located on the right side to begin adding a new property.
Now, please specify whether the property listing already exists within your Airbnb account or if it is a new property that you intend to create.
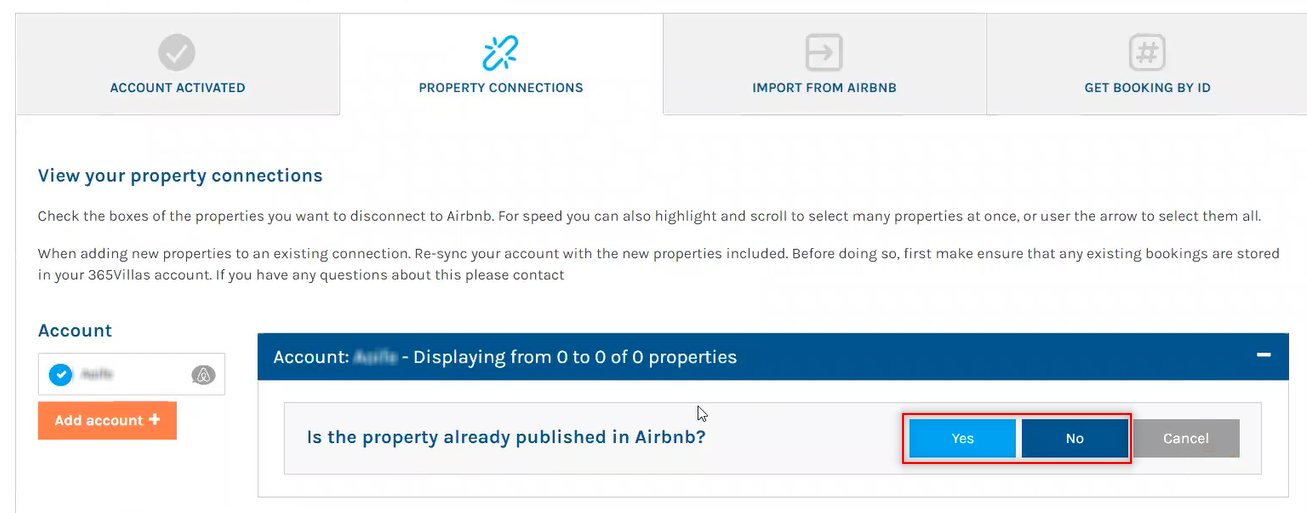
If the property is already listed on Airbnb, the system will automatically establish a connection and update the Airbnb listing with the information from our Property Management System (PMS). If the property is new and not yet listed on Airbnb, we will transmit all the necessary property details to Airbnb to create a new listing.
Mapping an Existing Property:
- ‘Select your 365Villas listings’: Displays all properties registered in 365Villas.
- ‘Sync with Airbnb property’: Shows all properties currently live on Airbnb.
- Additional settings: Choose between “Limited Sync” and “Sync All” options.
- Markup (optional): Adjust pricing to compensate for Airbnb’s commission fees.
- Under “Limited Sync”, only rates, availability, and minimum stay details will be synchronized. This option is ideal if you prefer to manage your listing’s content directly on Airbnb.
With “Sync All”, every detail of your 365Villas property listing will be synchronized and managed from within 365Villas, ensuring a comprehensive update across platforms.
Pushing a New Property:
Select Listings: Access all properties registered in 365Villas.
Default Sync: Choose “Sync All” for full synchronization across channels.
Markup (Optional): Implement a pricing markup to cover Airbnb commission costs, if necessary.
Instant Sync: Toggle On or Off for immediate synchronization.

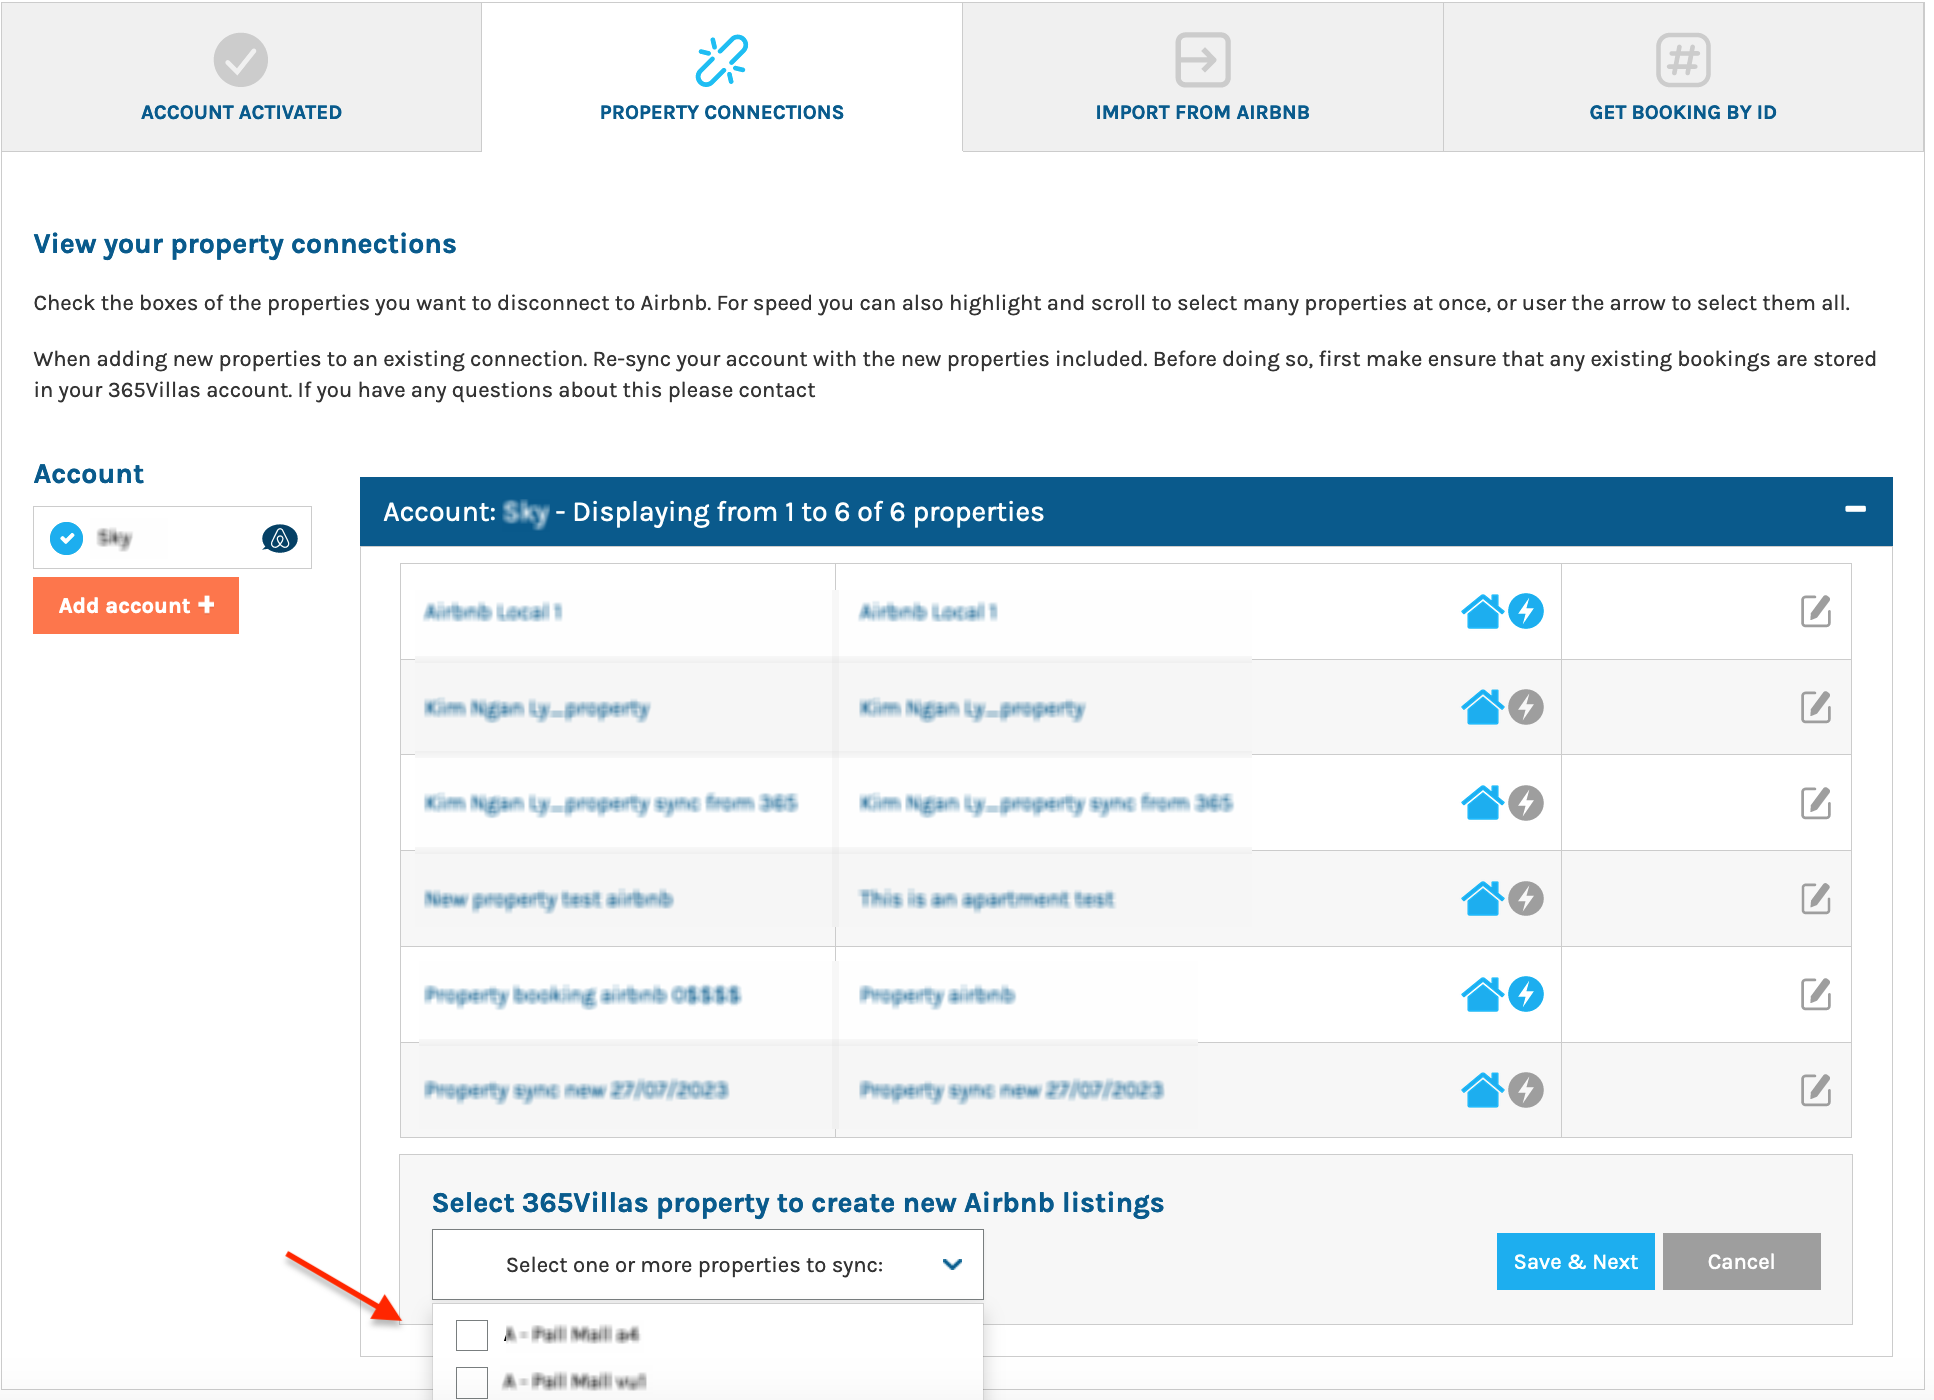
Selecting and Saving a Property:
- Choose the desired property.
- Click “Save and next.”
Once all necessary information is filled in:
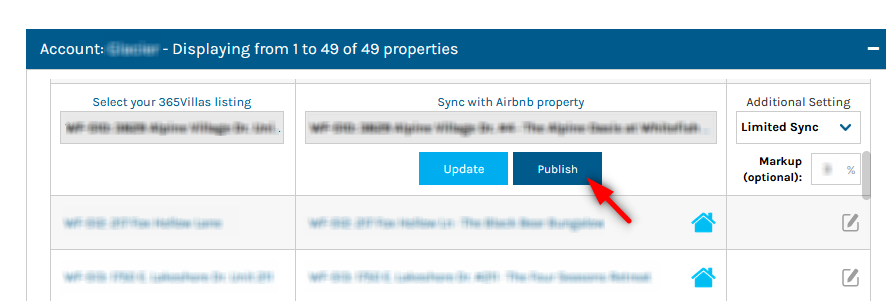
Click on “Link & Connect” to finalize the connection.
Understanding Instant Booking and Non-Instant Booking:
Instant Booking:
This feature allows guests to immediately reserve properties by selecting available dates, providing their information, and confirming their booking. Acceptance of house rules is automatic. Instant Booking is exclusively available for properties with the “Sync All” synchronization option selected.
Non-Instant Booking / On Request:
In this mode, guests submit a booking request, engage in communication with the host, and finalize booking details before confirmation. This option provides more control over who books the property.
Adjustments to Synchronization and Markup:
You can change the synchronization type (from “Sync All” to “Limited” or vice versa) and adjust the markup to cover Airbnb’s commission fees at any point.
After completing all the information for either booking type:
Click on “Link & Connect” to establish the connection.

Once the property is connected, it will be displayed on the list with a house icon to its right. A blue icon indicates that the property is active and has been successfully connected, while a grey icon signifies that the property is not live or connected. If you are synchronizing several properties simultaneously, the connection process for all of them may take some time. Please wait a few minutes before refreshing the page to check the updated status.

You can modify the property connection by clicking on the pencil icon next to it. This action allows you to edit the synchronization type and markup. Furthermore, you have the option to update the listing by re-pushing all content to Airbnb and saving the changes. From this section, you can also choose to unlist the property if needed.

Click on “Add Property” to proceed with the process.
Additional Insights:
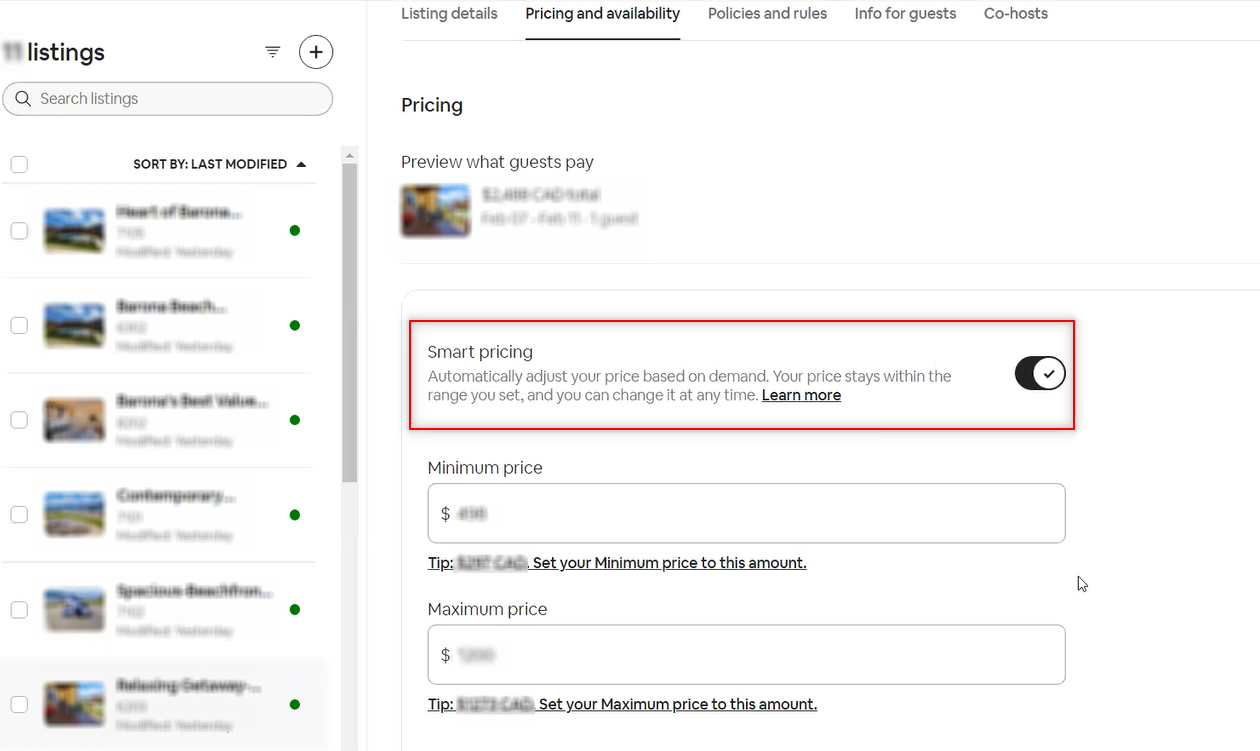
Airbnb Smart Pricing: If Airbnb Smart Pricing was previously enabled on your listing, it will be disabled once 365Villas takes over the management of Pricing and Availability. Should you be interested in exploring Dynamic Pricing options within 365Villas, please feel free to inquire. Additionally, we are excited to announce our integration with PriceLabs, now available, and Beyond Pricing, which will be coming soon.
Airbnb ID Access: Simply hover over a listing to reveal the Airbnb ID, facilitating easy confirmation of the live listing.

Accessing Live Airbnb Listing: To view a live Airbnb listing, insert the Airbnb Property ID into the URL as follows: www.airbnb.com/rooms/AIRBNB_PROPERTY_ID. Replace AIRBNB_PROPERTY_ID with the actual ID of the listing.
Airbnb Dashboard: Utilize the Airbnb property Dashboard to monitor synchronization status and access synchronization settings.
Import from Airbnb into 365Villas
To transfer properties from Airbnb into 365Villas, you have two options:
- Manually Create and Link: Manually create the properties in 365Villas and then link them to your Airbnb listings. This method may be quicker and more efficient if you’re starting anew with Airbnb.
- Direct Import: If your listings are already established on Airbnb, you can directly import them into 365Villas. Please be aware that some property details might not be fully compatible with this process. It’s crucial to review the imported listings and update any missing information. Should you need assistance, don’t hesitate to reach out to your dedicated account manager.
Steps to Import from Airbnb:
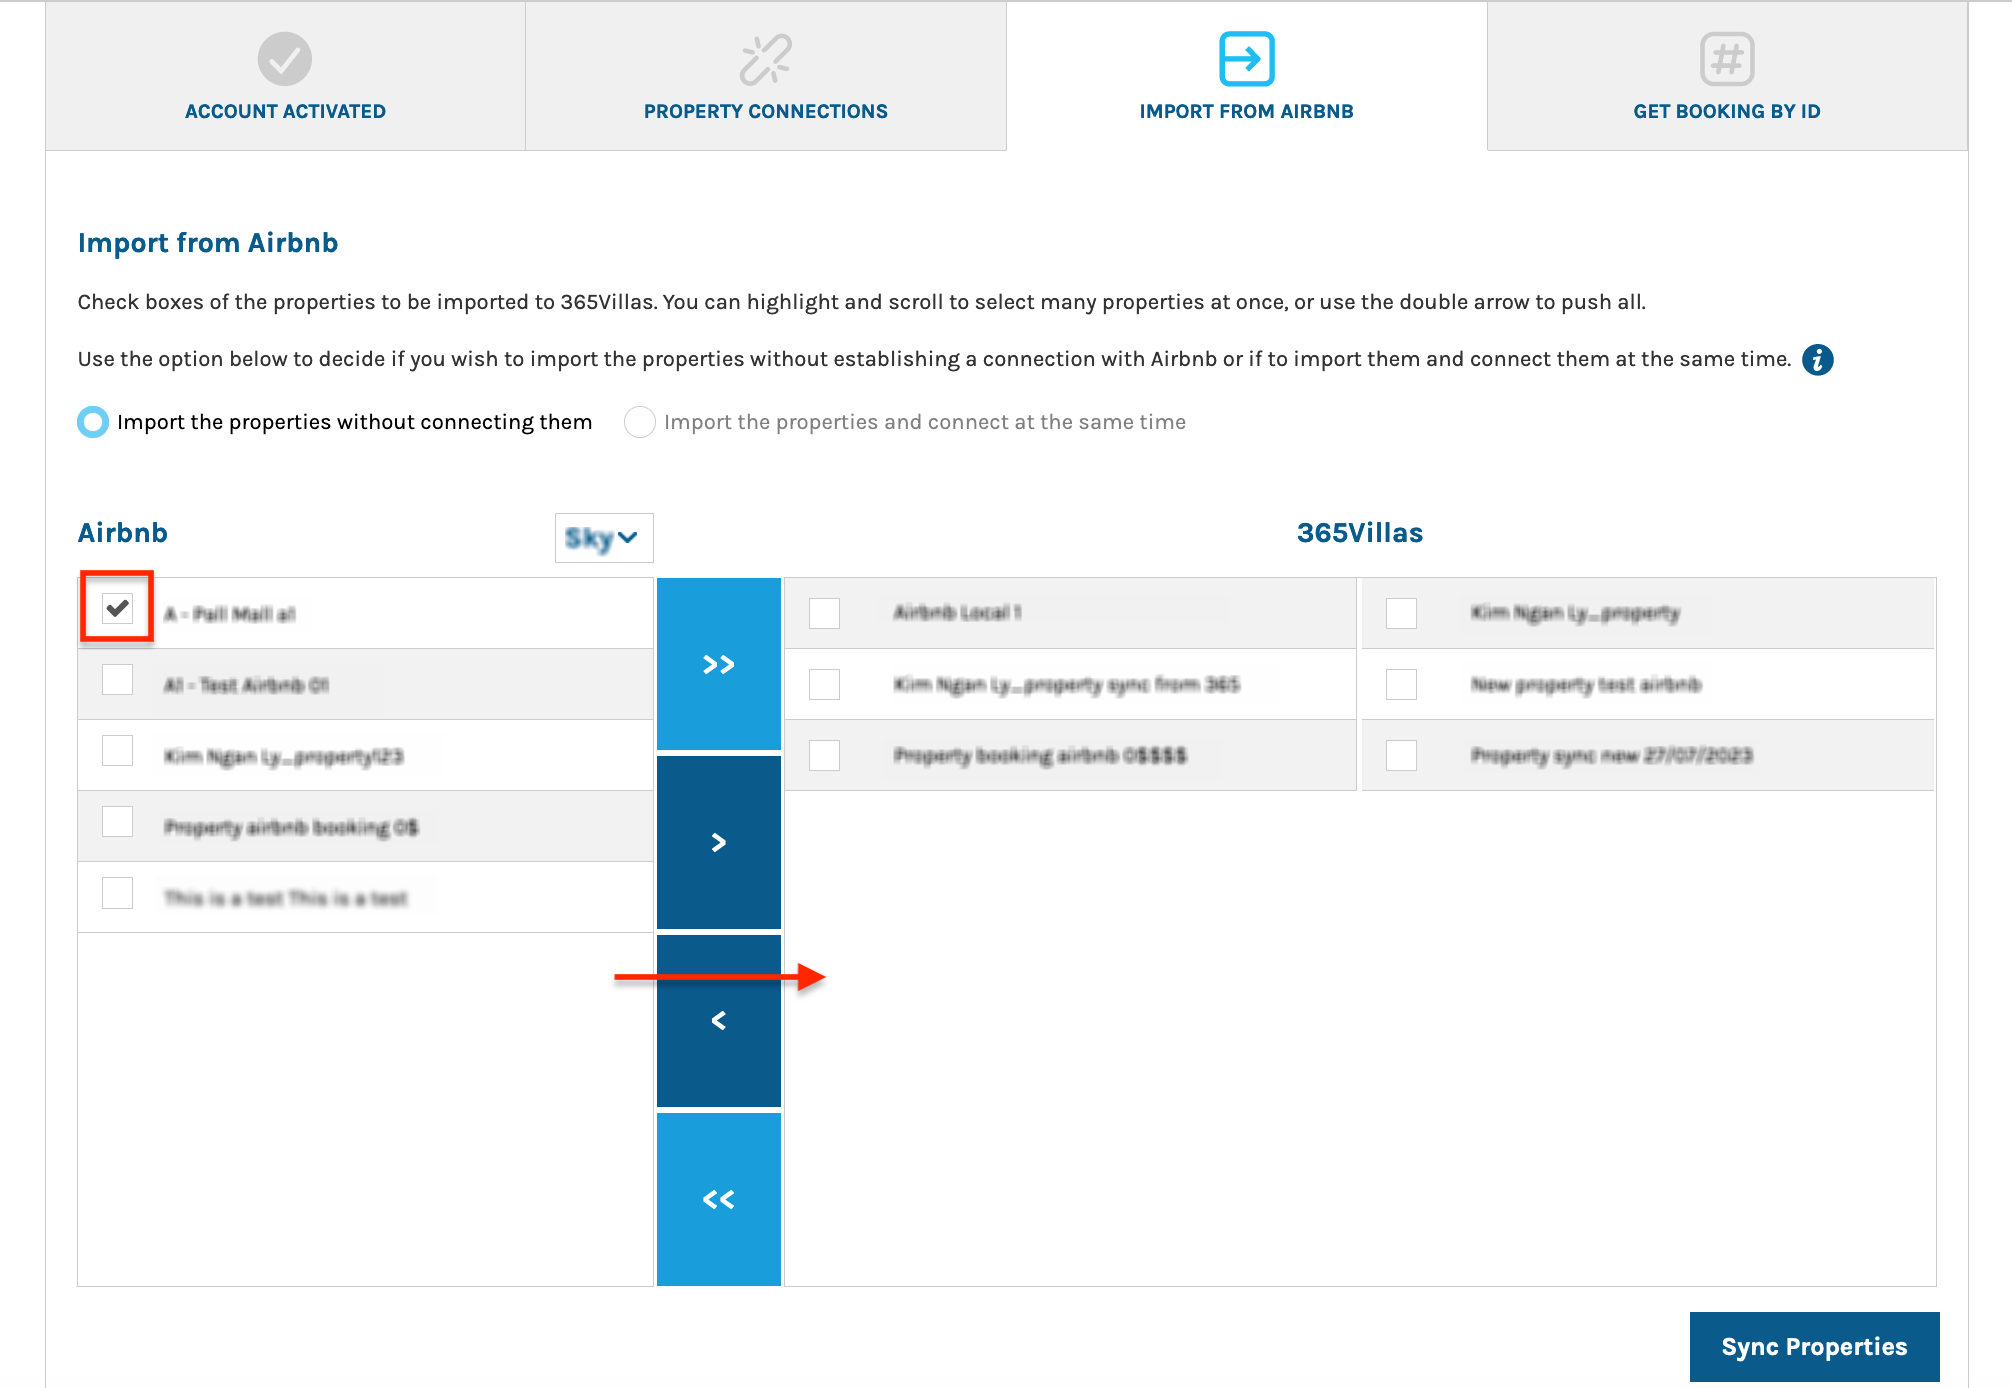
- Navigate to the “Import from Airbnb” tab within 365Villas.
- Select the relevant Airbnb account and properties from the options displayed on the right-hand side.
- Decide whether to solely import the properties or to both import and automatically connect them to 365Villas.
- Use the “Move Selected” or “Move All” option to shift your chosen properties into the designated area within 365Villas for further actions.
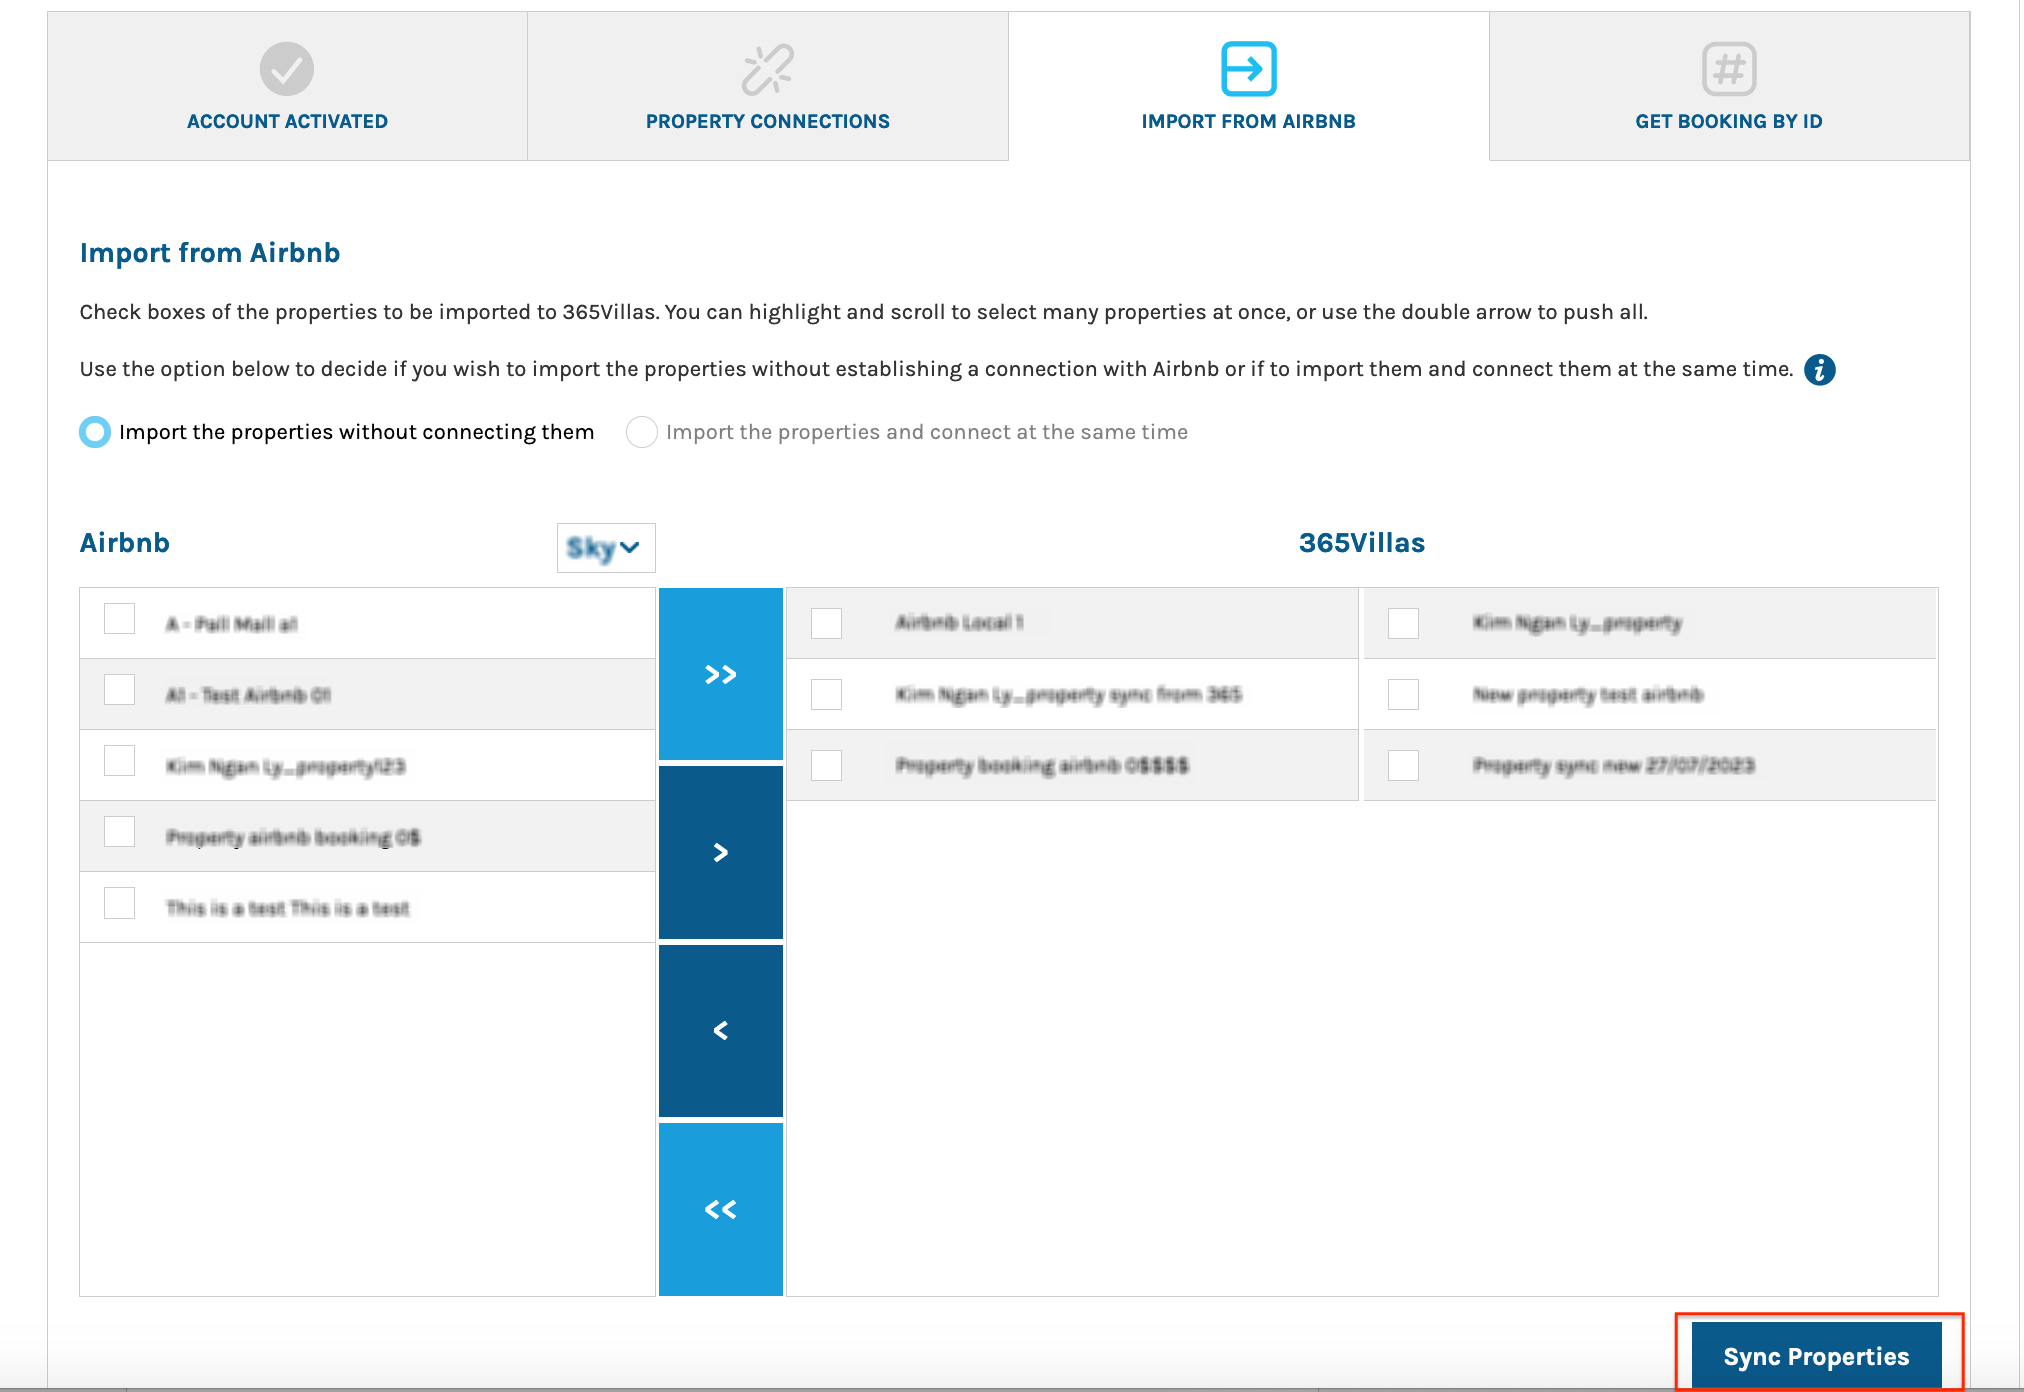
Then, click the “Sync Properties” button to begin the synchronization process. The duration of this process can vary, usually taking a few minutes, though it depends on the total number of properties being imported.
NOTE: You have the option to choose whether to maintain property connections during the import. If you expect delays in updating all the imported properties, it might be beneficial to import them without establishing connections immediately. This allows you to manage the connection process at a more convenient time after the import has been completed. 
It’s important to note that properties imported and automatically connected via 365Villas are configured with a default “Sync All” setting. This ensures comprehensive synchronization of all property details right from the start. 
Should you find it necessary, you have the option to adjust the synchronization setting from “Sync All” to “Limited Sync.”
If you accidentally move the wrong properties to the right side, simply refresh the page without saving. This action will reset the properties to their original positions on the left.
To ensure that any newly added properties are fully integrated into 365Villas, you have two options:
- Access the properties using the dropdown menu located in the top-right corner of the interface.
- Use the internal search feature to find specific properties quickly.
Finally, it’s crucial to review the Portfolio Settings page in 365Villas for any potentially missing information. Make sure to update the listing as needed to complete the integration process effectively.
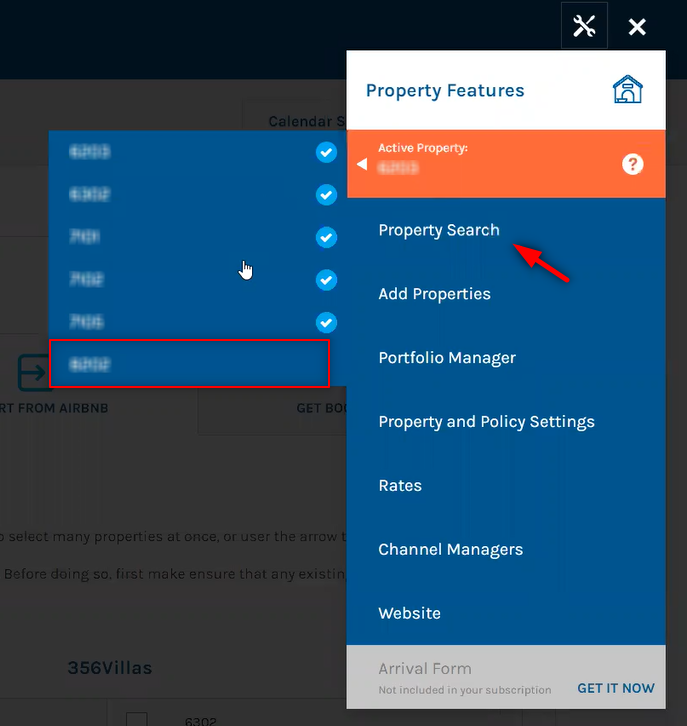
Please take a moment to review the Portfolio Settings to identify any missing information. Once identified, proceed to update the listing accordingly. This important step ensures that all necessary details for the property are accurately and comprehensively reflected.
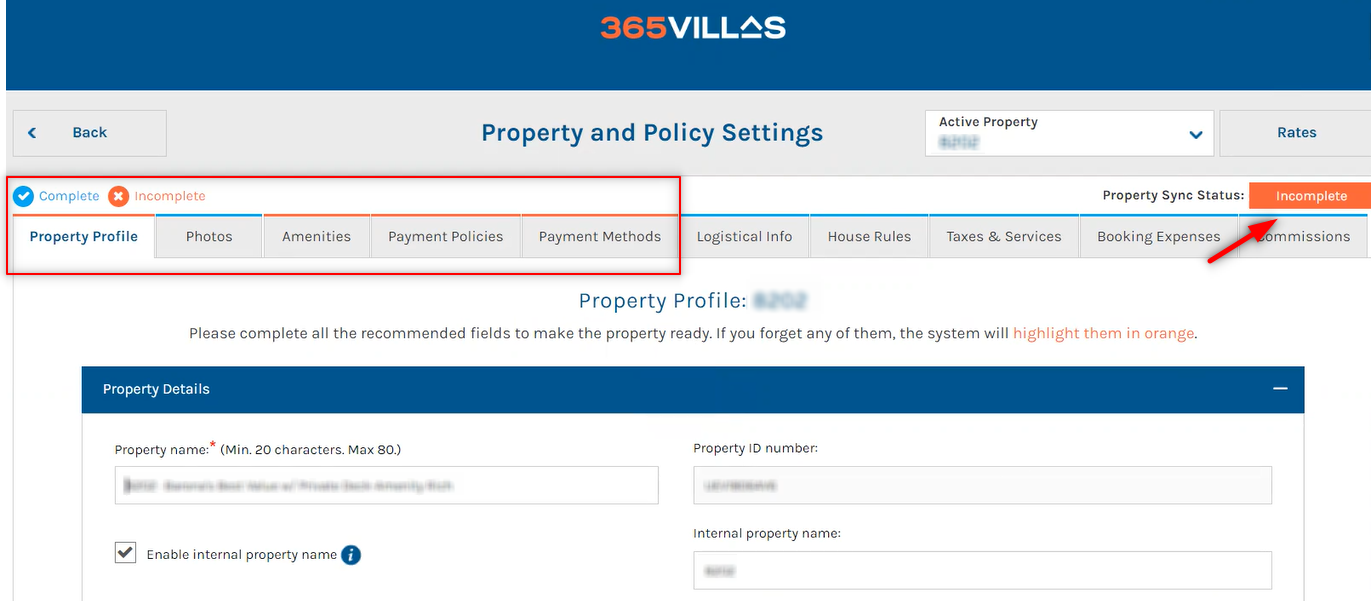
NOTE: If you cannot find your property among the imported properties, please review your available property licenses. Navigate to Account Details to verify both available licenses and those currently in use.
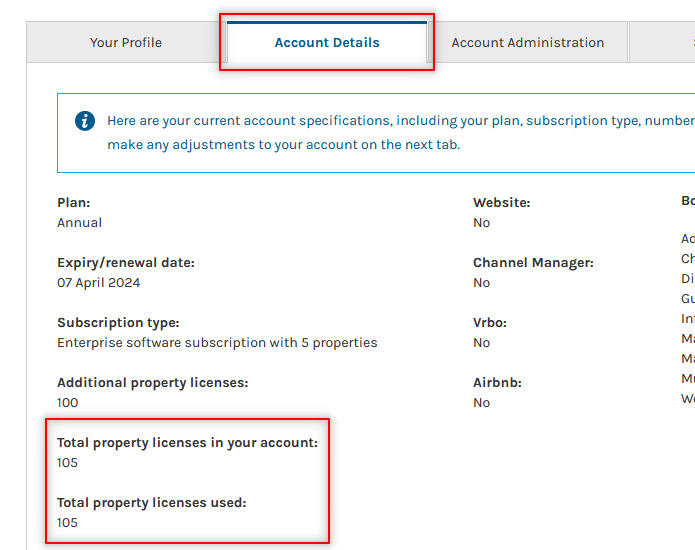
If you require additional licenses, please proceed to Account Administration for the option to upgrade.

Unlisting or Disconnecting Properties
You have full control to unlist or disconnect properties as needed. Simply select a property and choose the appropriate option.

Property Status on Airbnb Listing Page:
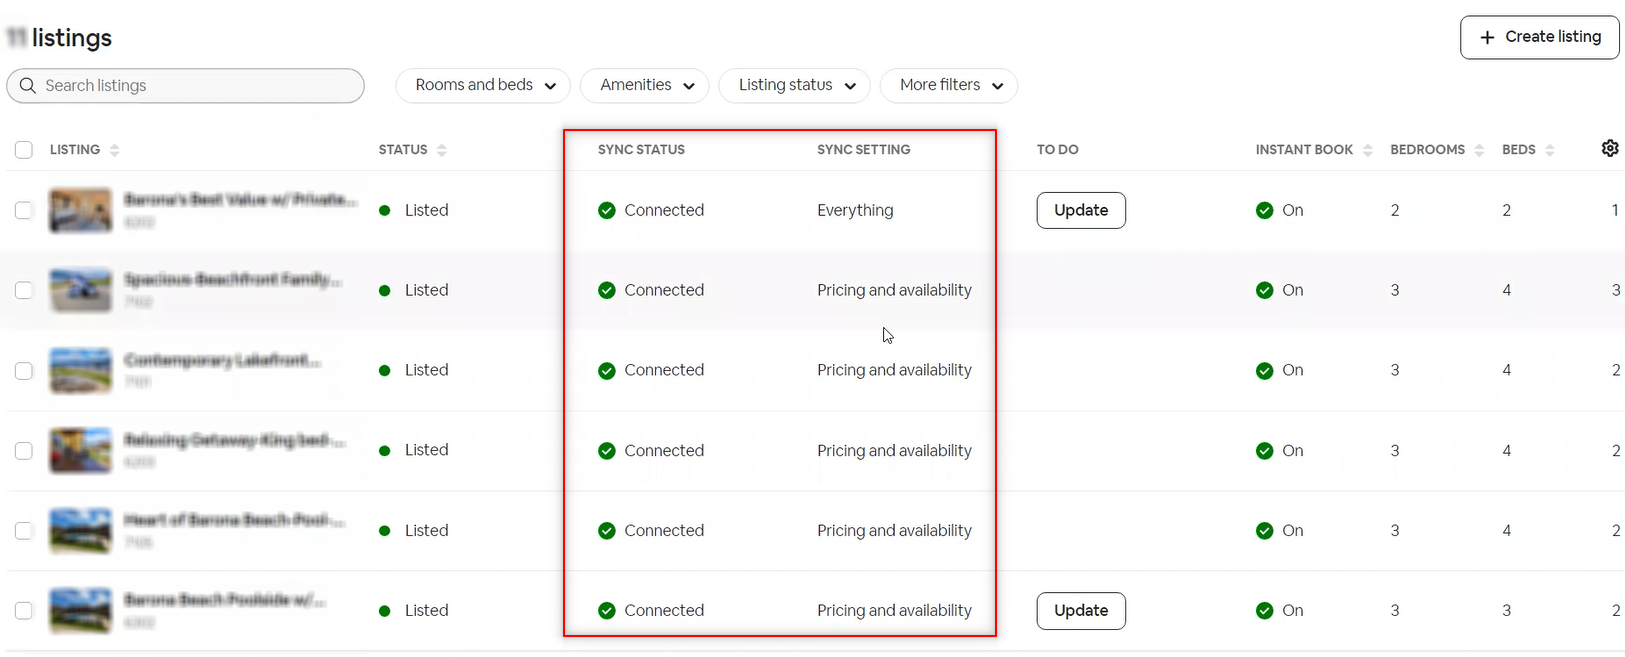
On the Airbnb listing page, property statuses are categorized as follows:
- Listed: Connected to a Channel Manager.
- Unlisted: Not connected to a Channel Manager.
- Connected: Linked to a Channel Manager.
- Not Connected: Not linked to a Channel Manager.
For example, a property can be listed but not connected, or unlisted but connected.
Importing Airbnb Reservations:
If you have bookings in your Airbnb account that have not been imported into 365Villas yet, follow these steps:
- Access the “Get Booking by ID” section.
- Choose the correct account if you have multiple connections.
- Add Airbnb booking ID(s) or select to import all existing future reservations.
- Click “Get reservations” to import the booking(s).
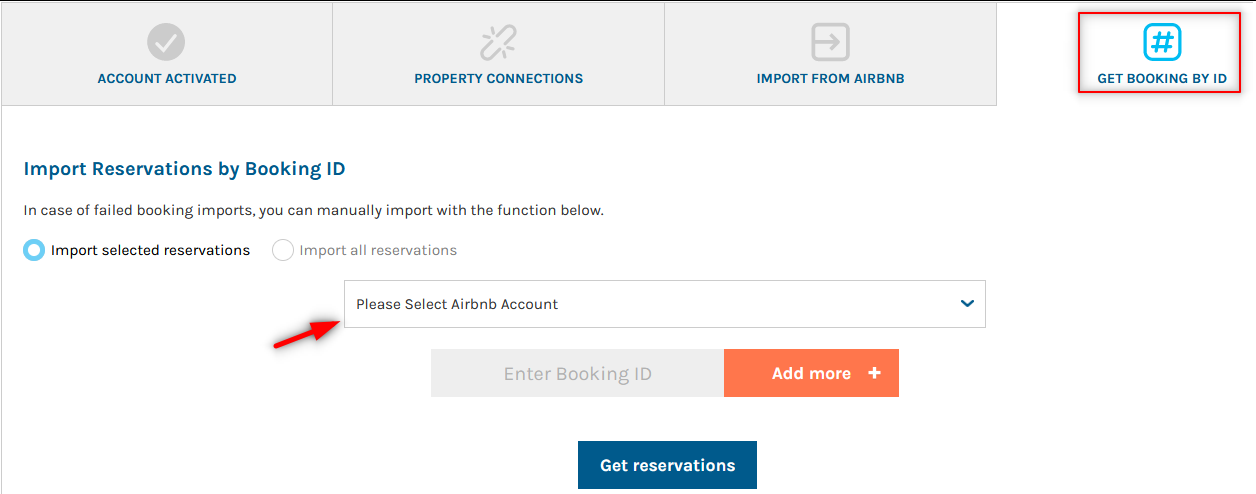
NOTE: This area is exclusively for importing Airbnb reservations. For reservations from other channels, please utilize the provided xls upload during onboarding or access the Reservation Manager area.
Instant Booking Indicator
The lightning bolt symbol indicates the status of instant booking, whether it’s turned on or off. If you are unable to accept instant bookings for some of your properties, you can switch it off at any time.

N

